Chaffle Pesto Mozzarella Sandwich
This Chaffle Pesto Mozzarella Sandwich transforms the viral keto chaffle into an irresistible lunch option. Crispy on the outside, fluffy on the inside, and loaded with fresh basil pesto and melted mozzarella, it's the perfect low-carb alternative to traditional sandwiches. Ready in just 15 minutes with only a handful of ingredients!

What Makes This Chaffle Sandwich Special
Chaffles, or cheese waffles, have revolutionized keto cooking by providing a versatile, crispy base for countless dishes. Unlike traditional bread that spikes blood sugar, these egg and cheese creations deliver satisfying crunch while keeping you in ketosis. The magic happens in the waffle iron where the cheese caramelizes against the hot plates, creating a golden, crispy exterior that rivals any bread.
This particular recipe elevates the basic chaffle with aromatic garlic powder and almond flour for structure. The addition of baking powder creates tiny air pockets that make the chaffle light and fluffy inside while maintaining that essential crispiness outside. The pesto and mozzarella filling transforms these simple waffles into a restaurant-quality sandwich that's ready in minutes. Each bite delivers creamy, herby, cheesy goodness with only 4g net carbs per serving.
💡 Professional Tip
Let chaffles cool for 1-2 minutes after cooking before assembling the sandwich. This allows the cheese to set properly and creates the crispiest texture. If you stack them immediately while hot, they'll become soft and lose that essential crunch.
Frequently Asked Questions
Absolutely! Cook the chaffles and store them unfilled in an airtight container in the refrigerator for up to 4 days. When ready to eat, reheat the chaffles in a toaster or air fryer at 350°F for 2-3 minutes to restore crispiness, then add the pesto and cheese. You can also freeze cooked chaffles for up to 3 months - separate them with parchment paper to prevent sticking.
Coconut flour works but use only 1 tablespoon since it's much more absorbent than almond flour. You can also make chaffles without any flour using just eggs and cheese, though they'll be slightly more fragile. For a nut-free option, try sunflower seed flour using the same measurement as almond flour.
Soggy chaffles usually result from not cooking them long enough or trying to remove them too soon. Cook until they stop steaming and achieve a golden brown color. The chaffle should release easily from the waffle iron when done. Also ensure your waffle iron is properly preheated and lightly greased to prevent sticking.
Yes! While mozzarella creates the best texture, you can experiment with cheddar, provolone, or a Mexican cheese blend for the chaffle batter. For the filling, fresh mozzarella can be replaced with provolone, fontina, or even sliced cheddar. Avoid very oily cheeses like gouda which can make chaffles greasy.
The chaffle is done when it stops producing steam, turns golden brown, and releases easily from the waffle iron without sticking. This typically takes 3-4 minutes in most mini waffle makers. If you try to open it and it resists, close it and cook for another 30-60 seconds. The edges should be crispy and slightly darker than the center.
This sandwich pairs beautifully with a simple mixed green salad dressed with olive oil and lemon, crispy air-fried zucchini chips, or a cup of tomato soup for a comforting lunch. For a complete meal, serve alongside roasted vegetables, cucumber salad, or keto coleslaw. It's also delicious with a side of marinara sauce for dipping.
Definitely! Try a caprese version with sliced tomatoes and fresh basil, a pizza chaffle with marinara and pepperoni, or a breakfast version with eggs and bacon. You can also add sun-dried tomatoes to the batter, use different pestos like sun-dried tomato or arugula pesto, or add sliced avocado for extra creaminess and healthy fats.
Store assembled sandwiches in an airtight container in the refrigerator for up to 2 days, though they're best eaten fresh. To reheat, remove and discard any wilted pesto, then reheat the chaffle with cheese in a 350°F oven or air fryer for 3-4 minutes until the cheese melts and the chaffle crisps up again. Add fresh pesto after reheating for the best flavor.
Recipe Troubleshooting Guide
Chaffle Sticks to Waffle Iron
Problem: Your chaffle is stuck to the waffle maker and tears when you try to remove it.
Solution: This means it needs more cooking time or the iron wasn't greased enough. Always spray or brush the waffle iron with oil before each chaffle. If it sticks, close the iron and cook for another 30-60 seconds. The chaffle should release easily when fully cooked. Consider investing in a non-stick waffle maker specifically designed for chaffles.
Chaffle Falls Apart
Problem: Your chaffle is too fragile and breaks when you try to handle it.
Solution: Add an extra tablespoon of almond flour to the batter for more structure, or make sure you're using enough eggs to bind the ingredients. Also, let the chaffle cool for 1-2 minutes after cooking before removing it from the iron - this allows the proteins to set. Ensure you're measuring the shredded cheese by packing it lightly, not loosely.
Cheese Doesn't Melt
Problem: The mozzarella slices in your sandwich aren't melting properly.
Prevention: Use room temperature cheese rather than cold from the refrigerator, and return the assembled sandwich to the warm waffle iron for 30-60 seconds with the lid closed. Alternatively, microwave for 15-20 seconds or place in a 350°F oven for 2-3 minutes. Fresh mozzarella has higher moisture content and melts more easily than low-moisture mozzarella.
Pesto Makes Chaffle Soggy
Problem: The pesto is soaking into the chaffle and making it soft.
Recovery: Don't add the pesto until right before eating, and make sure your chaffles are completely cooled before assembly. If your pesto is very oily, drain off excess oil before spreading. You can also toast the inner sides of the chaffles for 30 seconds in the waffle iron after cooking to create a barrier that resists moisture absorption.
Batter Too Thick or Thin
Problem: Your chaffle batter consistency doesn't seem right.
Prevention: The batter should be thick like pancake batter but pourable. If too thick, add a teaspoon of water or a small splash of heavy cream. If too thin, add another tablespoon of almond flour. Remember that the batter will thicken slightly as it sits because the almond flour absorbs moisture. Mix just until combined to avoid overworking the eggs.
Flavor Balance Issues
Too Sweet: If your pesto tastes too sweet from basil intensity, balance it with a squeeze of fresh lemon juice and extra salt.
Too Salty: If the sandwich is too salty from the cheese and pesto, reduce the salt in the chaffle batter and use unsalted butter for greasing.
Bland: If flavors seem flat, add more garlic powder to the batter, use high-quality fresh pesto, and sprinkle flaky sea salt on the assembled sandwich.

Choosing the Right Ingredients for Perfect Chaffles
The quality of your ingredients directly impacts the texture and flavor of your chaffles. For the shredded mozzarella, choose a low-moisture variety rather than fresh mozzarella, as excess moisture will create soggy chaffles. Pre-shredded cheese often contains anti-caking agents that can affect texture, so shredding your own block of mozzarella produces superior results. The eggs should be large and at room temperature for better mixing and more consistent texture.
Your pesto choice makes or breaks this sandwich. Homemade pesto offers the brightest flavor with fresh basil, quality olive oil, pine nuts, garlic, and Parmesan cheese. If buying store-bought, read labels carefully and choose options with olive oil as the first ingredient rather than vegetable oils. Fresh mozzarella for the filling should be sliced about 1/4 inch thick - thin enough to melt quickly but thick enough to provide substantial cheese flavor and satisfying texture in every bite.
Essential Ingredient Notes
- Mozzarella Cheese: Use low-moisture, part-skim mozzarella for the chaffle batter. Full-fat can work but may create greasier chaffles. Shred it yourself from a block for better melting and texture. The cheese should be cold from the refrigerator for easier shredding but will mix fine into room temperature eggs.
- Almond Flour: Blanched almond flour works best as it's finely ground and creates a smoother texture. Avoid almond meal which is coarser and will make denser, grittier chaffles. Store almond flour in the refrigerator or freezer to prevent it from going rancid, and always measure by spooning it into the measuring cup rather than scooping.
- Basil Pesto: Look for pesto with olive oil, fresh basil, pine nuts, garlic, and Parmesan cheese as the main ingredients. Avoid versions with vegetable oil fillers or excessive additives. If making homemade, blanch basil leaves for 5 seconds before blending to preserve the bright green color and prevent oxidation that causes browning.

Mastering the Chaffle Cooking Technique
The secret to restaurant-quality chaffles lies in proper waffle iron technique. Preheating is essential - your waffle maker should be hot enough that a drop of water sizzles immediately on contact. This high heat creates the caramelized, crispy exterior that defines a great chaffle. Pour the batter into the center of the iron and close the lid immediately. Resist the urge to open it too soon, as this releases steam and prevents proper cooking.
Timing varies by waffle maker, but most mini waffle irons require 3-4 minutes for perfect chaffles. You'll know it's ready when the steaming stops and the chaffle releases easily without resistance. For ultimate crispiness, let cooked chaffles rest on a wire cooling rack rather than stacking them immediately. This allows air circulation around all sides, preventing trapped steam from softening the texture. When assembling sandwiches, work quickly and serve immediately for the best contrast between crispy exterior and melted cheese interior.
The Perfect Chaffle Flip Test
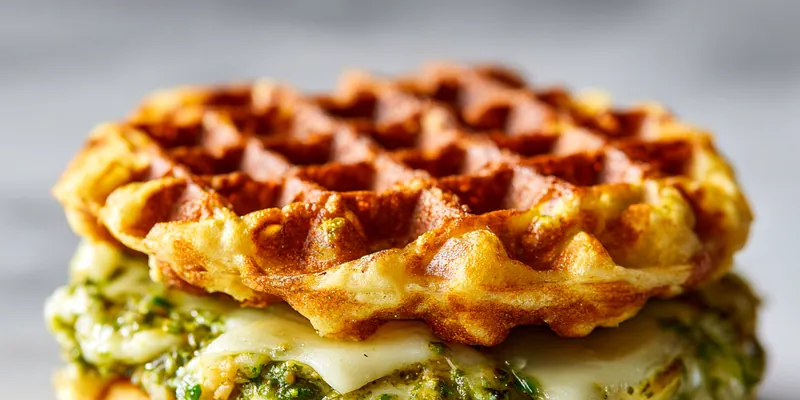
After 3 minutes of cooking, gently lift the waffle iron lid about halfway. If the chaffle resists or pulls apart, immediately close the lid and cook for another 30-60 seconds. A properly cooked chaffle will release cleanly with no sticking. The surface should be golden brown with darker edges, and you should hear a slight crackle as it cools, indicating the cheese has properly caramelized. This crispy exterior is what makes chaffles such a satisfying low-carb bread substitute.
Chaffle Pesto Mozzarella Sandwich
📋 Ingredients
For the Chaffles
- 4 tablespoons basil pestoUse homemade or quality store-bought with olive oil as first ingredient
- 4 slices fresh mozzarella cheeseAbout 1/4 inch thick, room temperature melts better
For the Filling
- 1 cup shredded mozzarella cheese, dividedLow-moisture, part-skim works best; shred from block for optimal texture
- 2 large eggsRoom temperature eggs mix more easily and create fluffier chaffles
- 1/4 cup almond flourBlanched, finely ground; adds structure without grittiness
- 1/2 teaspoon baking powderCreates light, fluffy texture with tiny air pockets
- 1/4 teaspoon garlic powderAdds savory depth that complements the pesto
- Pinch of saltEnhances cheese flavor; reduce if using salted butter on waffle iron
- Cooking spray or butterEssential for preventing sticking; reapply between each chaffle
Instructions
Prepare Chaffle Batter
In a medium bowl, whisk together eggs, almond flour, baking powder, garlic powder, and salt until smooth. Fold in 3/4 cup shredded mozzarella cheese until evenly distributed. The batter will be slightly thick and cheesy with visible cheese strands throughout.
Preheat Waffle Iron
Preheat your mini waffle maker to medium-high heat for 3-5 minutes. Lightly spray with cooking spray or brush with melted butter, ensuring all surfaces are coated to prevent sticking. The iron should be hot enough that a drop of water sizzles immediately.
Cook Chaffles
Pour 1/4 of the batter (about 3 tablespoons) into the center of the waffle iron. Close the lid and cook for 3-4 minutes without opening. The chaffle is done when steaming stops and it releases easily with golden brown color. Transfer to a wire rack and repeat to make 4 chaffles total, regreasing the iron between each.
Assemble Sandwiches
Let chaffles cool for 1-2 minutes. Spread 2 tablespoons of pesto on one chaffle, covering the surface evenly. Layer with 2 slices of fresh mozzarella cheese, then top with a second chaffle. Press gently to adhere. Repeat for the second sandwich.
Optional Melting Step
For extra melty cheese, return assembled sandwiches to the closed waffle iron for 30-60 seconds, checking frequently to avoid over-browning. Alternatively, place in a preheated 350°F oven for 2-3 minutes until cheese melts. Serve immediately while hot and crispy.
Recipe Notes & Tips
Storage
Store cooked chaffles unfilled in an airtight container in the refrigerator for up to 4 days or freeze for up to 3 months separated by parchment paper. Reheat in a toaster or air fryer at 350°F for 2-3 minutes to restore crispiness before assembling. Assembled sandwiches are best eaten fresh but can be refrigerated for up to 2 days.
Serving Suggestions
Serve with a mixed green salad, air-fried vegetables, tomato soup, or keto coleslaw. Cut diagonally for easier eating and an attractive presentation. These make excellent meal prep lunches when components are stored separately and assembled before eating. Perfect for brunches, quick lunches, or light dinners.
Variations
Try different fillings like turkey and avocado, ham and Swiss cheese, or caprese with tomatoes and basil. Add sun-dried tomatoes to the batter for extra flavor. Use different pestos such as sun-dried tomato, arugula, or cilantro-lime. For a pizza version, use marinara sauce and pepperoni. Experiment with different cheese blends in the batter like cheddar or Italian blend.