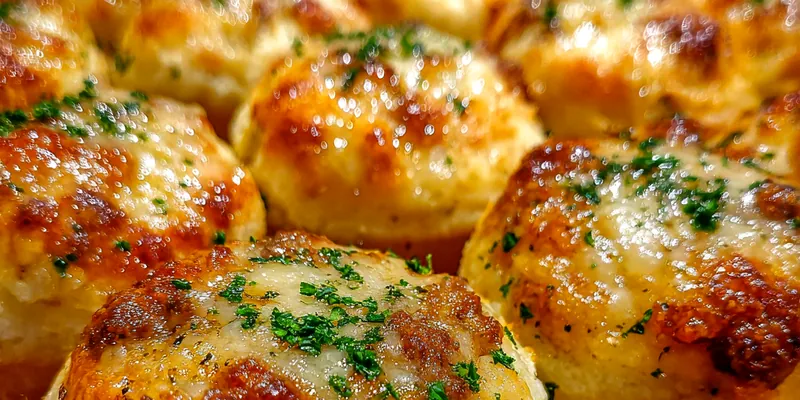
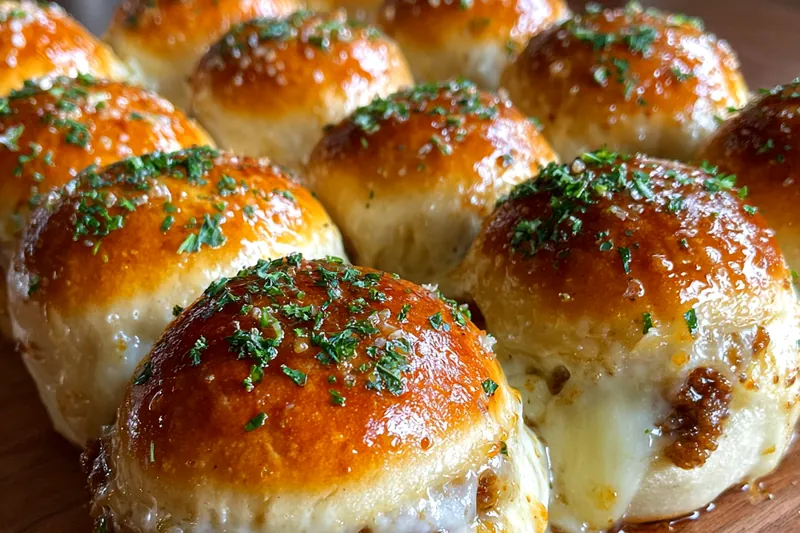
Cheesy Garlic Bread Bombs
Cheesy Garlic Bread Bombs are the ultimate appetizer for any cheese lover. These delightful bites are filled with gooey cheese and flavored with savory garlic. Perfect for parties, game nights, or family gatherings, they are sure to impress everyone at the table. Follow this simple recipe to create a cheesy sensation that will have your guests coming back for more.

Why This Cheesy Garlic Bread Bombs Recipe Works
This recipe combines the classic flavors of garlic bread with a fun twist. The pizza dough creates a perfect vessel for the warm, melted cheese, while the buttery garlic topping enhances the flavor. Each bomb is easy to make and delivers a satisfying crunch when baked.
The technique of sealing the filling within the dough ensures that all the gooey goodness is trapped inside. Baking them until golden brown gives a delightful contrast between the crispy exterior and the soft, cheesy interior.
💡 Professional Tip
For the best results, make sure to seal the dough tightly around the filling to prevent any cheese from oozing out during baking. Additionally, using fresh garlic instead of garlic powder will significantly enhance the flavor of your Cheesy Garlic Bread Bombs.
Frequently Asked Questions
Yes, you can prepare the Cheesy Garlic Bread Bombs ahead of time. Assemble them and place them in the refrigerator for up to 24 hours before baking. When ready to bake, add a few extra minutes to the cooking time if they are cold from the fridge.
If you don't have mozzarella cheese on hand, you can use provolone or fontina cheese as a substitute. Both options melt well and will still provide that delicious cheesy goodness. For a sharper flavor, you can also mix in some cheddar cheese.
The Cheesy Garlic Bread Bombs are done when they are golden brown on the outside. You can also check the internal temperature with a food thermometer; it should reach at least 165°F (74°C) for the cheese to be fully melted.
Yes, you can freeze the assembled but unbaked Cheesy Garlic Bread Bombs. Place them in a single layer on a baking sheet until frozen, then transfer them to a freezer-safe bag. When ready to bake, they can go directly from the freezer to the oven; just add a few extra minutes to the baking time.
These Cheesy Garlic Bread Bombs pair wonderfully with marinara sauce or garlic dipping sauce. You can also serve them with a fresh salad or a side of roasted vegetables for a complete meal.
Cooked Cheesy Garlic Bread Bombs can be stored in the refrigerator for up to 3 days. Make sure to place them in an airtight container to maintain their freshness and flavor.
Absolutely! You can prepare the Cheesy Garlic Bread Bombs in advance, assemble them, and store them in the fridge. This way, you can bake them just before serving, ensuring they are fresh and hot.
To reheat the Cheesy Garlic Bread Bombs, preheat your oven to 350°F (175°C). Place them on a baking sheet and cover with aluminum foil to prevent burning. Heat for about 10-15 minutes or until warmed through.
Recipe Troubleshooting Guide
Too Dry
Problem: If your Cheesy Garlic Bread Bombs turn out too dry, it may be due to overbaking or not enough filling.
Solution: To prevent this, make sure to keep an eye on the baking time, and ensure each bomb is adequately filled with cheese.
Not Crispy Enough
Problem: If the bombs are not crispy, it could be due to not baking long enough or using too much moisture in the filling.
Solution: Ensure the oven is preheated adequately and consider using drier cheese varieties or squeezing out excess moisture from ingredients like garlic.
Overcooked
Problem: Overcooked Cheesy Garlic Bread Bombs can become hard and unpleasant to eat.
Prevention: To prevent this, make sure to follow the baking time closely, and check on them a few minutes before the time is up.
Undercooked Center
Problem: If the center of the bombs is undercooked, the dough may be too thick or they may not have baked long enough.
Recovery: Make sure to roll the dough thinly and check internal temperature to ensure they are fully cooked.
Burnt Exterior
Problem: Burnt exterior can occur if the oven temperature is too high or if they are left in the oven too long.
Prevention: Consider lowering the oven temperature slightly and checking for doneness a few minutes earlier.
Flavor Balance
Too Sweet: If your Cheesy Garlic Bread Bombs are too sweet, consider reducing any sweet components in your filling.
Too Salty: If they are too salty, use less salt in the filling and opt for low-sodium cheese.
Bland: To fix blandness, add more spices or fresh herbs to enhance the overall flavor of the dish.
Essential Ingredients for Cheesy Garlic Bread Bombs
Key ingredients for Cheesy Garlic Bread Bombs include high-quality pizza dough and a blend of mozzarella and Parmesan cheeses. The freshness of garlic and herbs elevates the flavor profile, making these bites irresistible. Ensure that your ingredients are fresh for the best results.
Choosing the right cheese is crucial; mozzarella provides the gooey texture, while Parmesan adds a delicious, nutty flavor. Always opt for freshly grated cheese for the best melting properties.
Essential Ingredient Notes
- Pizza Dough: Using store-bought pizza dough can save time, but homemade dough offers a fresher flavor. If you're using store-bought, make sure to let it come to room temperature before handling.
- Mozzarella Cheese: Fresh mozzarella melts beautifully and gives a stretchy texture. Avoid pre-shredded cheese, as it often contains anti-caking agents that can affect melting.
- Garlic: Fresh garlic is essential for a robust flavor. You can adjust the amount to taste, but don't skip this ingredient as it is the star of the recipe.

Step-by-Step Cooking Process
The cooking process for Cheesy Garlic Bread Bombs is straightforward. Begin by preparing your ingredients and cutting the dough into squares. Mixing the filling is quick, and assembly is fun, especially when involving family or friends.
Baking until golden ensures a crunchy exterior while the filling remains gooey and delicious. Following the recipe closely will yield perfect results every time.
Key Technique for Perfect Cheesy Garlic Bread Bombs
The most important technique for making Cheesy Garlic Bread Bombs is sealing them properly. This prevents any cheese from leaking out during baking, ensuring every bite is filled with cheesy goodness.
Cheesy Garlic Bread Bombs
📋 Ingredients
Main Ingredients
- 1 cup butterRoom temperature
- 1 tablespoon minced garlicFresh garlic
- 1 tablespoon fresh parsleyChopped
- 1/2 teaspoon saltTo taste
- 1/4 teaspoon black pepperTo taste
For the Sauce
- 1 lb pizza doughRoom temperature
- 1 cup shredded mozzarella cheeseFor the filling
- 1/2 cup grated Parmesan cheeseFor the filling
- 3 tablespoons minced garlicFor the filling
- 4 tablespoons unsalted butterMelted for brushing
- 1 teaspoon dried oreganoFor the filling
- 1 teaspoon dried parsleyFor the filling
- 1/2 teaspoon saltFor the filling
Instructions
Prepare Dough
Preheat your oven to 375°F (190°C). On a lightly floured surface, roll out the pizza dough into a large rectangle.
Mix Filling
In a bowl, combine the mozzarella, Parmesan, minced garlic, oregano, parsley, salt, black pepper, and red pepper flakes. Mix well.
Cut Dough
Cut the pizza dough into squares, about 3x3 inches, and place a spoonful of the cheese mixture in the center of each square.
Form Bombs
Fold the corners of the dough squares towards the center over the cheese filling and pinch to seal tightly.
Prepare for Baking
Place the sealed dough bombs on a greased baking sheet, seam side down. Brush the tops with the beaten egg.
Make Garlic Butter
In a small bowl, mix the melted butter with the remaining minced garlic and a pinch of salt.
Bake
Bake in the preheated oven for 25-30 minutes or until golden brown.
Brush with Garlic Butter
Remove from the oven and immediately brush with the garlic butter mixture.
Serve
Let cool slightly before serving. Enjoy your cheesy garlic bread bombs warm!
Recipe Notes & Tips
Storage Tips
Store any leftover Cheesy Garlic Bread Bombs in an airtight container in the fridge for up to 3 days. To keep them fresh, ensure they are completely cooled before sealing.
Serving Suggestions
Serve Cheesy Garlic Bread Bombs hot with marinara sauce for dipping. They also pair well with a crisp salad or fresh vegetables for a balanced meal.
Recipe Variations
You can customize these Cheesy Garlic Bread Bombs by adding cooked bacon, spinach, or other favorite ingredients to the cheese filling. For a spicy kick, consider adding jalapeños or sriracha to the mixture.