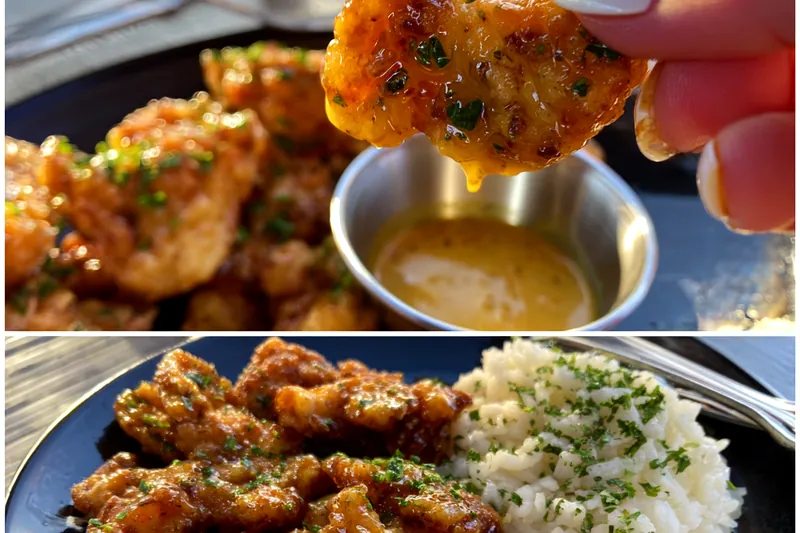
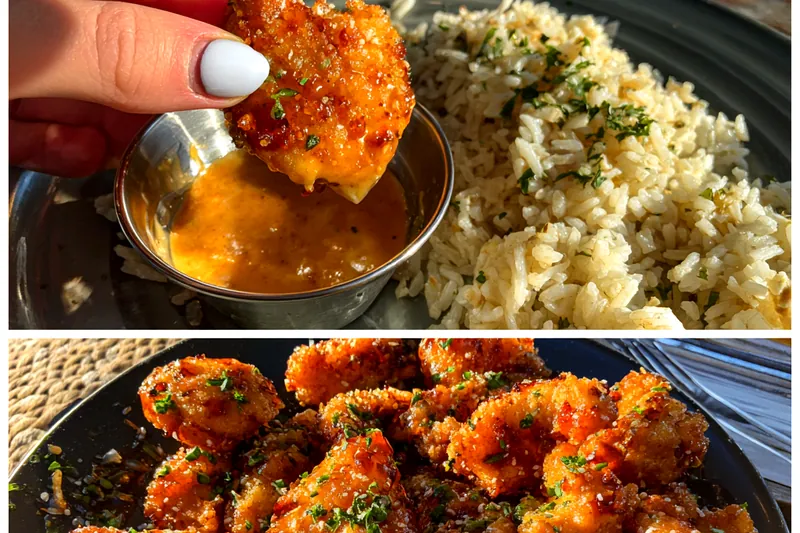
Crispy Glazed Chicken Tenders
Crispy Glazed Chicken Tenders are the perfect family dinner, combining crunch with a sweet and savory glaze. This dish is easy to make and sure to impress everyone at the table. With a golden, crispy coating and a delicious glaze, they are a hit for both kids and adults alike. Serve these tenders with your favorite dipping sauces for an extra treat!


Why This Crispy Glazed Chicken Tenders Recipe Works
This recipe stands out because of its combination of textures and flavors. The crispy panko coating perfectly contrasts with the sweet and savory glaze, making every bite a delight. The simplicity of the ingredients also means you can whip this up without spending hours in the kitchen.
Using panko breadcrumbs is key to achieving the crunchiness that defines these tenders. The baking technique ensures they come out golden brown without the need for frying, making it a healthier option. This recipe is all about balancing flavor and texture for a satisfying dish.
💡 Professional Tip
For extra crispiness, consider double-coating the chicken tenders. After the initial coating with the flour and egg, dip them again in the egg wash and then back into the panko. This will add an additional layer of crunch that elevates the dish.
Frequently Asked Questions
Yes, you can prepare the chicken tenders in advance by coating them and storing them in the refrigerator for a few hours. This allows the flavors to meld. However, it's best to glaze them just before serving for the freshest taste.
If you don't have panko breadcrumbs, regular breadcrumbs can be used, though the texture will be slightly different. You can also crush crackers or cornflakes for a unique twist that still provides a crispy coating.
The chicken tenders are done when they are golden brown and reach an internal temperature of 165°F (75°C). Cut into one of the thicker pieces to check for any pinkness. Juices should run clear.
Yes, these chicken tenders can be frozen. After glazing, allow them to cool completely, then place them in a single layer in a freezer-safe container. They can be stored for up to three months and reheated when needed.
Pair these chicken tenders with a side of coleslaw or a fresh green salad for a balanced meal. For dipping, try ranch, honey mustard, or barbecue sauce. These combinations enhance the flavors of the tenders.
Crispy Glazed Chicken Tenders can last in the refrigerator for 3-4 days when stored in an airtight container. To maintain their crispiness, reheat them in the oven instead of the microwave.
Preparing the chicken tenders in advance is a great option. You can coat them and keep them in the fridge until you are ready to bake them. Just remember to glaze them right before serving to ensure maximum flavor.
To reheat, preheat your oven to 375°F (190°C). Place the chicken tenders on a baking sheet and heat for about 10-15 minutes until they are warmed through and the coating becomes crispy again.
Recipe Troubleshooting Guide
Too Dry
Problem: The chicken tenders can sometimes turn out dry if overcooked.
Solution: To avoid this, monitor the cooking time closely and always ensure the internal temperature does not exceed 165°F (75°C). Basting with glaze during the last few minutes helps retain moisture.
Not Crispy Enough
Problem: If the tenders aren't crispy, they may not have been baked long enough or the coating may have been too thin.
Solution: Ensure a generous coating of panko breadcrumbs and bake at the right temperature for the recommended time to achieve that desirable crunch.
Overcooked
Problem: If the chicken tenders become overcooked, they may dry out and lose flavor.
Prevention: To prevent this, use a meat thermometer to check for doneness and remove them from the oven immediately once they reach the right temperature.
Undercooked Center
Problem: An undercooked center can lead to health risks and unappetizing texture.
Recovery: If you suspect they are undercooked, place them back in the oven until they reach the proper temperature. Use a thermometer for accuracy.
Burnt Exterior
Problem: A burnt exterior indicates that the cooking temperature was too high or they were left in the oven for too long.
Prevention: To maintain a golden brown color, keep an eye on the cooking time and lower the oven temperature slightly if necessary.
Flavor Balance
Too Sweet: If the glaze is too sweet, add a splash of vinegar or soy sauce to balance flavors.
Too Salty: If the dish is too salty, serve with a side of unsalted rice or bread to absorb some saltiness.
Bland: To enhance flavor, sprinkle extra seasoning or serve with a zesty dipping sauce.
Essential Ingredients for Crispy Glazed Chicken Tenders
The key ingredients for this recipe include chicken tenders, flour, eggs, and panko breadcrumbs. Each component plays a vital role in achieving the desired texture and flavor. Using high-quality chicken ensures a juicy result, while the panko provides the unmistakable crunch.
When selecting ingredients, opt for fresh chicken and high-quality panko for the best results. Fresh herbs can also elevate the dish significantly. The right ingredients will not only enhance the taste but also make the cooking experience more enjoyable.
Essential Ingredient Notes
- Chicken Tenders: Choosing fresh, high-quality chicken tenders is crucial for achieving tender and juicy results. Look for tenders that are pink and firm, avoiding any that appear discolored or have an off smell.
- Panko Breadcrumbs: Panko breadcrumbs are lighter and crispier than regular breadcrumbs, making them ideal for achieving that perfect crunch. Store them in a cool, dry place to maintain their texture and freshness.
- Honey: Using pure honey in your glaze will provide a rich sweetness and depth of flavor. Avoid processed honey for the best taste, and consider mixing it with other ingredients for a unique flavor profile.
Step-by-Step Cooking Process
Cooking Crispy Glazed Chicken Tenders involves a straightforward process that ensures success every time. By following the steps carefully, you’ll produce tenders that are crispy on the outside and tender on the inside. The baking method makes it a healthier alternative to frying.
Achieving perfect results involves paying close attention to the cooking times and maintaining proper temperatures. Basting the tenders with glaze during the last few minutes of baking guarantees a rich flavor and shiny finish.
Key Technique for Perfect Crispy Glazed Chicken Tenders
The secret to perfectly crispy chicken tenders lies in the double-coating technique. By dipping the chicken first in the flour, then in the egg wash, and finally in the panko breadcrumbs, you create a thicker, crunchier crust that locks in moisture and flavor.
Crispy Glazed Chicken Tenders
📋 Ingredients
Main Ingredients
- 1 cup butterRoom temperature
- 1/2 cup honeyNatural honey
- 1/4 cup soy sauceLow sodium preferred
- 1 tbsp apple cider vinegarFor tanginess
- 1/2 tsp red pepper flakesFor a hint of spice
For the Sauce
- 2 lbs chicken tendersCut into pieces
- 1 cup all-purpose flourFor coating
- 1 tsp garlic powderFor flavor
- 1 tsp onion powderFor flavor
- 1 tsp paprikaFor color and flavor
- 1/2 tsp black pepperFor seasoning
- 2 eggsFor binding
- 2 cups panko breadcrumbsFor crispiness
Instructions
Prepare Ingredients
Gather all the ingredients and preheat the oven to 400°F (200°C).
Season Chicken
In a bowl, mix flour, garlic powder, onion powder, paprika, black pepper, and salt. Dredge the chicken tenders in the flour mixture.
Prepare Egg Wash
In another bowl, beat the eggs until frothy, then set aside.
Coat Chicken
Dip each floured chicken tender into the egg wash and then coat with panko breadcrumbs.
Bake Chicken
Place the coated chicken tenders on a baking sheet and bake for 25-30 minutes or until golden brown.
Make the Glaze
In a saucepan, melt butter and mix in honey, soy sauce, apple cider vinegar, and red pepper flakes. Cook until combined.
Glaze Chicken
Once the chicken is cooked, brush the glaze over the chicken tenders and return to the oven for an additional 5 minutes.
Serve
Remove from oven, garnish with fresh parsley, and serve hot.
Recipe Notes & Tips
Storage Tips
To store leftovers, place the chicken tenders in an airtight container in the refrigerator. They should be consumed within 3-4 days for the best quality. If you want to keep them longer, consider freezing them.
Serving Suggestions
These Crispy Glazed Chicken Tenders can be served with a variety of sides, such as mashed potatoes, coleslaw, or a fresh garden salad. They also pair well with a selection of dipping sauces for added flavor.
Recipe Variations
Feel free to experiment with different spices in the coating or add herbs to the glaze for a unique twist. You can also replace chicken with other proteins like tofu or shrimp to suit different dietary needs.