Crispy Philly Cheesesteak Grilled Wraps
These Crispy Philly Cheesesteak Grilled Wraps take everything you love about the classic sandwich and transform it into an easy-to-eat, perfectly portioned wrap with an irresistibly crispy exterior. Tender ribeye steak, caramelized peppers and onions, and gooey melted provolone are wrapped in a flour tortilla and grilled to golden perfection. It's comfort food made simple, ready in just 35 minutes!


Why These Wraps Beat Traditional Cheesesteaks
While I have deep respect for the classic Philly cheesesteak hoagie, these wraps offer several advantages for home cooking. The tortilla creates a better bread-to-filling ratio, meaning every bite contains meat, cheese, and vegetables without overwhelming bread. The grilling process creates a crispy, golden exterior that adds textural contrast you simply can't achieve with a soft hoagie roll. Plus, wraps are naturally portion-controlled and much easier to eat without making a mess.
The secret to these wraps is the grilling technique borrowed from quesadilla preparation. By buttering the outside and cooking in a hot skillet, you achieve restaurant-quality results at home. The high heat creates beautiful char marks while melting the cheese to gooey perfection. The tight wrapping keeps all the ingredients secure, so you get a perfect bite every time. Unlike traditional cheesesteaks that can be messy and fall apart, these wraps maintain their structure from first bite to last.
💡 Professional Tip
Let the wraps rest for 1-2 minutes after grilling before cutting. This allows the cheese to set slightly, preventing it from all oozing out when you slice through. It also makes the wraps easier to handle and ensures cleaner cuts.
Frequently Asked Questions
You can prep the steak and vegetable filling up to 24 hours in advance and store it refrigerated. When ready to serve, reheat the filling gently, then assemble and grill the wraps fresh. I don't recommend assembling the wraps ahead of time as the tortillas will become soggy. However, you can grill them, let them cool completely, wrap individually in foil, and refrigerate for up to 2 days. Reheat in a 350°F oven for 10-12 minutes until crispy and heated through.
Provolone is the traditional choice for Philly cheesesteaks and provides excellent melting quality with a mild, slightly tangy flavor. You can also use American cheese for a more authentic street-style taste, or try a combination of provolone and white American. Mozzarella works in a pinch but has less flavor. Avoid pre-shredded cheese if possible - sliced or freshly shredded cheese melts much better without the anti-caking additives.
Ribeye is ideal because of its marbling and tenderness, but you can substitute with sirloin, skirt steak, or flank steak for a leaner option. The key is slicing the meat very thin against the grain - partially freezing the steak for 30 minutes makes this much easier. You can also use pre-sliced steak from the butcher or even shaved steak labeled specifically for cheesesteaks. Ground beef works too but changes the texture significantly - if using ground beef, cook it fully and drain excess fat before assembling.
If your skillet is too small to cook all the steak and vegetables at once, work in batches to avoid overcrowding. Overcrowding causes steaming instead of browning. For grilling the wraps, you can use a panini press, griddle, or even a waffle iron for similar results. If you only have a small skillet for grilling, cook the wraps one or two at a time, keeping finished ones warm in a 200°F oven.
The wraps are ready when both sides are golden brown with visible char marks, the tortilla feels crispy when pressed gently, and you can see melted cheese beginning to ooze slightly from the edges. The internal temperature should reach 165°F if you want to check with a thermometer. If the outside browns too quickly before the cheese melts, reduce your heat slightly and cook a bit longer. Each side typically needs 3-4 minutes over medium heat.
These wraps pair wonderfully with classic cheesesteak accompaniments like crispy french fries, sweet potato fries, or onion rings. For a lighter option, serve with a simple side salad, coleslaw, or pickled vegetables to cut through the richness. Au jus or cheese sauce makes an excellent dipping sauce. Other great sides include potato chips, pasta salad, roasted vegetables, or even a bowl of tomato soup for a comforting meal.
Absolutely! Replace the steak with thick-sliced portobello mushrooms, plant-based steak strips, or seasoned seitan. Increase the amount of peppers and onions, and consider adding mushrooms for extra umami flavor. You can also use grilled zucchini, eggplant, or cauliflower. Season generously with Worcestershire sauce (or soy sauce for vegan), garlic, and Italian herbs to boost the savory flavor profile.
Store leftover grilled wraps in an airtight container or wrapped individually in foil in the refrigerator for up to 3 days. To reheat, place in a 350°F oven for 10-15 minutes until heated through and crispy again. You can also reheat in a skillet over medium-low heat, flipping once. Avoid microwaving as it makes the tortilla soggy. If you have leftover filling (unassembled), store it separately for up to 4 days and use it to make fresh wraps, or serve over rice or in a hoagie roll.
Recipe Troubleshooting Guide
Soggy Tortillas
Problem: The tortillas become soggy instead of crispy when grilling.
Solution: This happens when there's too much moisture in the filling or not enough heat. Make sure to drain excess liquid from the steak and vegetables before assembling. Pat the filling with paper towels if needed. Ensure your skillet is properly preheated to medium heat before adding wraps. Use enough butter on the outside - it helps create that crispy texture. Also, don't overload the wraps with filling as excess moisture will leak out.
Wrap Falls Apart
Problem: The wrap opens up or falls apart during grilling or eating.
Solution: This is usually caused by overfilling or improper folding technique. Use only about 1/2 to 3/4 cup of filling per wrap, leaving space at the edges. When rolling, fold the sides in first, then roll tightly from bottom to top, tucking as you go. Place the wrap seam-side down in the skillet first - this helps seal it. Press gently with a spatula while cooking. If your tortillas are old or dry, warm them slightly in the microwave for 10-15 seconds to make them more pliable before filling.
Cheese Won't Melt
Problem: The cheese stays solid or doesn't melt completely inside the wrap.
Prevention: Use sliced or freshly shredded cheese rather than pre-shredded, which contains additives that prevent melting. Make sure the filling is still warm when assembling - hot filling helps melt the cheese. You can also place a lid over the skillet while grilling to trap heat and encourage melting. If needed, reduce heat to medium-low and cook longer to give the cheese time to melt without burning the tortilla. Starting with room temperature cheese also helps.
Steak Is Tough
Problem: The steak pieces are chewy or tough instead of tender.
Recovery: Always slice your steak very thin (about 1/8 inch) against the grain - this is crucial for tenderness. Partially freezing the steak for 20-30 minutes makes it easier to slice thin. Don't overcook the steak; it should only take 3-4 minutes over high heat. Overcooked beef becomes tough. Using a well-marbled cut like ribeye also ensures tenderness. If your steak is particularly lean, consider marinating it for 30 minutes in Worcestershire sauce, oil, and garlic before cooking.
Uneven Browning
Problem: Parts of the wrap are burnt while other parts are pale.
Prevention: This indicates uneven heat distribution. Make sure your skillet is fully preheated before adding wraps. Spread the butter evenly over the entire surface of each tortilla. If your stovetop has hot spots, rotate the wrap 180 degrees halfway through cooking each side. Use medium heat rather than high - too much heat causes burning before the inside heats through. An electric griddle provides more even heat distribution if you have one available.
Flavor Balance Issues
Too Sweet: If the peppers make it too sweet, reduce the amount of bell peppers or use all green peppers which are less sweet. Add a splash of vinegar or more Worcestershire sauce to balance sweetness.
Too Salty: If it's too salty, it's likely from the cheese and Worcestershire sauce. Use low-sodium Worcestershire and reduce the added salt. Consider using part mozzarella instead of all provolone. Adding more vegetables dilutes saltiness.
Bland: If the flavor is bland, the filling wasn't seasoned enough. Season the steak generously before cooking, not after. Add more Worcestershire sauce, garlic, black pepper, and a pinch of onion powder. Don't skip the caramelization step for peppers and onions - that's where deep flavor develops.
Ingredient Selection Guide
The quality of your ingredients directly impacts the final result of these wraps. For the steak, ribeye is the gold standard because its marbling creates incredible flavor and ensures tenderness even with quick cooking. Look for ribeye with visible white fat marbling throughout - this fat renders during cooking and keeps the meat juicy. If ribeye is outside your budget, top sirloin or skirt steak are excellent alternatives. Ask your butcher to slice it thin, or do it yourself by partially freezing the steak for easier slicing.
For the peppers and onions, fresh is essential - never use pre-cut vegetables as they've lost moisture and flavor. Choose firm bell peppers with glossy skin and no soft spots. The combination of red, green, and yellow peppers provides visual appeal and a spectrum of flavors from sweet to slightly bitter. Yellow onions are preferred for their balance of sweetness and sharpness when caramelized. The cheese should be good-quality provolone - deli-sliced is ideal as it melts beautifully. Choose large, fresh flour tortillas (10-12 inch) that are soft and pliable, not stiff or cracked.
Essential Ingredient Notes
- Ribeye Steak: Choose ribeye with good marbling (white fat throughout) for maximum flavor and tenderness. Partially freeze for 20-30 minutes before slicing to make cutting thin slices easier. Always slice against the grain to ensure tender bites. Fresh steak works better than pre-packaged thin-sliced steak which can be dry.
- Provolone Cheese: Use deli-sliced provolone rather than pre-shredded for superior melting quality. Aged provolone has more flavor, while young provolone is milder and melts more smoothly. If you can't find provolone, white American cheese is the most authentic alternative for traditional Philly flavor. Let cheese come to room temperature before using for better melting.
- Flour Tortillas: Large 10-12 inch tortillas are essential - burrito-size works perfectly. Choose fresh, soft tortillas from the refrigerated section rather than shelf-stable ones. Tortillas should be pliable and slightly thick to hold the filling without tearing. If tortillas are stiff, microwave them wrapped in a damp paper towel for 15-20 seconds to make them more flexible before filling.

Mastering the Grilling Technique
The grilling technique is what transforms these from ordinary wraps into something spectacular. The key is creating a crispy, golden exterior while ensuring the cheese melts completely inside. Start with a properly preheated skillet over medium heat - not too hot or the outside burns before the inside heats through. Butter the outside of the wraps generously and evenly; this creates the golden color and crispy texture we're after. Place wraps seam-side down first, which helps seal them closed and prevents unraveling.
Resist the urge to press down hard on the wraps while cooking - gentle pressure is fine, but smashing them forces out the juices and cheese. Let each side cook undisturbed for 3-4 minutes to develop those beautiful char marks. You'll know it's time to flip when the bottom is golden brown and releases easily from the pan. If it sticks, it needs more time. After flipping, you can place a lid on the skillet for the last 1-2 minutes to trap heat and ensure the cheese melts completely. The final product should be crispy on the outside, with gooey melted cheese and hot filling inside.
The Perfect Fold and Seal
Proper wrapping technique prevents filling from spilling out. Place filling in a horizontal line across the center of the tortilla, leaving 2 inches of space on each side. Fold the left and right sides in toward the center first, overlapping slightly. Then, starting from the bottom edge closest to you, fold up and over the filling, tucking tightly as you roll away from yourself. Keep tension as you roll to create a tight, compact wrap. The final seam should be on top. Place seam-side down in the skillet - the heat and weight will seal it closed.
Crispy Philly Cheesesteak Grilled Wraps
📋 Ingredients
For the Filling
- 1 pound ribeye steak, thinly slicedPartially freeze for 30 minutes to make slicing easier; slice against the grain
- 2 tablespoons olive oil, dividedUse one tablespoon for steak, one for vegetables
- 1 large yellow onion, thinly slicedYellow onions caramelize beautifully; slice into half-moons
- 1 green bell pepper, thinly slicedRemove seeds and white membranes before slicing
- 1 red bell pepper, thinly slicedAdds sweetness and beautiful color
- 3 cloves garlic, mincedFresh garlic is essential; add towards end to prevent burning
- 1 tablespoon Worcestershire sauceAdds savory umami depth to the filling
- 1 teaspoon saltSeason steak generously before cooking
- 1/2 teaspoon black pepperFreshly ground black pepper has the best flavor
- 1/2 teaspoon Italian seasoningOptional but adds nice herbal notes
For Assembly
- 8 ounces provolone cheese, sliced or shreddedAbout 2 ounces per wrap; deli-sliced melts best
- 4 large flour tortillas (10-12 inch)Burrito-size; should be soft and pliable, not stiff
- 2 tablespoons butter, softenedFor brushing outside of wraps; softened butter spreads easily
Instructions
Prepare the Steak and Vegetables
Heat 1 tablespoon olive oil in a large skillet over medium-high heat. Season the thinly sliced ribeye with salt, pepper, and Italian seasoning. Add steak to the hot skillet and cook for 3-4 minutes, stirring occasionally, until browned and just cooked through. Don't overcook or it will become tough. Remove steak from skillet and set aside. In the same skillet, add the remaining tablespoon of olive oil, sliced onions, and bell peppers. Sauté for 5-6 minutes, stirring frequently, until vegetables are softened and beginning to caramelize. Add minced garlic and cook for 1 minute more until fragrant. Add Worcestershire sauce, then return the cooked steak to the pan and toss everything together to combine. Taste and adjust seasoning if needed. Remove from heat and let cool slightly.
Assemble the Wraps
Lay the four flour tortillas flat on a clean work surface. If tortillas are cold or stiff, warm them in the microwave for 10-15 seconds wrapped in a damp paper towel to make them more pliable. Divide the steak and vegetable mixture evenly among the four tortillas, placing it in a horizontal line across the center of each tortilla, leaving about 2 inches of space on the left and right sides. Top each portion of filling with about 2 ounces (1/2 cup) of provolone cheese, distributing it evenly over the hot filling. To wrap: fold the left and right sides of the tortilla toward the center first, then starting from the bottom edge, fold up and over the filling, tucking tightly as you roll away from yourself to create a compact, sealed wrap. The seam should be on top.
Grill the Wraps to Crispy Perfection
Heat a large skillet, griddle, or grill pan over medium heat. While it's heating, lightly brush or spread softened butter on the outside of each wrap, coating both the top and bottom surfaces evenly. Once the skillet is hot, place the wraps seam-side down in the pan (this helps seal them). Cook for 3-4 minutes without moving them, until the bottom is golden brown with visible grill marks and releases easily from the pan. Carefully flip each wrap using a spatula and cook for another 3-4 minutes on the second side until golden and crispy. You can place a lid on the skillet during the last 1-2 minutes to help the cheese melt completely. The wraps are done when both sides are crispy and golden, and you can see melted cheese beginning to ooze slightly from the edges. Work in batches if necessary, keeping finished wraps warm in a 200°F oven.
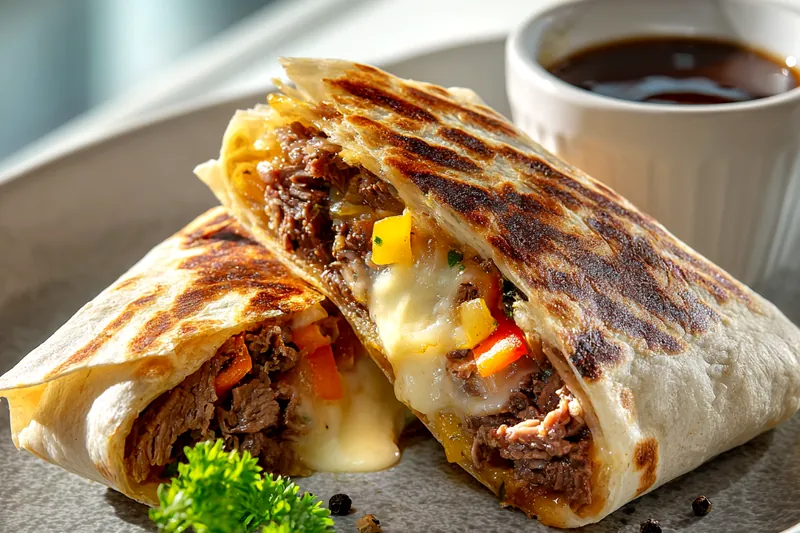
Rest and Serve
Remove the grilled wraps from heat and transfer to a cutting board. Let them rest for 1-2 minutes - this allows the cheese to set slightly and makes them easier to cut without all the cheese oozing out. Using a sharp knife, cut each wrap in half diagonally to showcase the beautiful layered interior. Arrange on serving plates or a platter. Garnish with fresh chopped parsley if desired. Serve immediately while hot and crispy, with optional sides of cheese sauce, au jus, or extra peppers for dipping. These wraps are best enjoyed fresh and hot when the contrast between the crispy exterior and gooey interior is at its peak.
Recipe Notes & Tips
Storage
Store leftover grilled wraps wrapped individually in foil or in an airtight container in the refrigerator for up to 3 days. Reheat in a 350°F oven for 10-15 minutes until heated through and crispy again, or in a skillet over medium-low heat. Avoid microwaving as it makes the tortilla soggy. Leftover filling (unassembled) can be stored separately for up to 4 days and used to make fresh wraps or served over rice.
Serving Suggestions
Serve these wraps with classic cheesesteak sides like crispy french fries, sweet potato fries, or onion rings. For lighter options, pair with a simple side salad, coleslaw, or pickled vegetables. Au jus or warm cheese sauce makes an excellent dipping accompaniment. These wraps are also perfect for game day parties, casual dinners, or quick lunches.
Variations
Make it spicy by adding sliced jalapeños or banana peppers to the filling, or drizzle with hot sauce. Try different cheeses like white American, cheddar, or a cheese blend. For a mushroom lover's version, add sautéed mushrooms to the vegetables. Make it pizza-style by adding a thin layer of marinara sauce before the cheese. Use whole wheat tortillas for added fiber. Substitute chicken breast or portobello mushrooms for a different protein option.