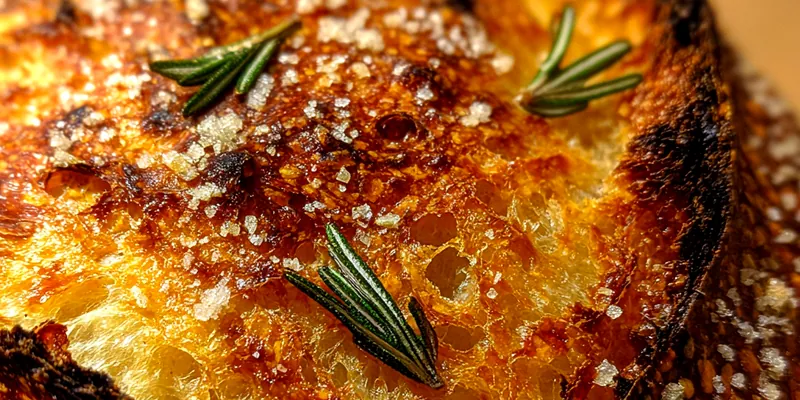
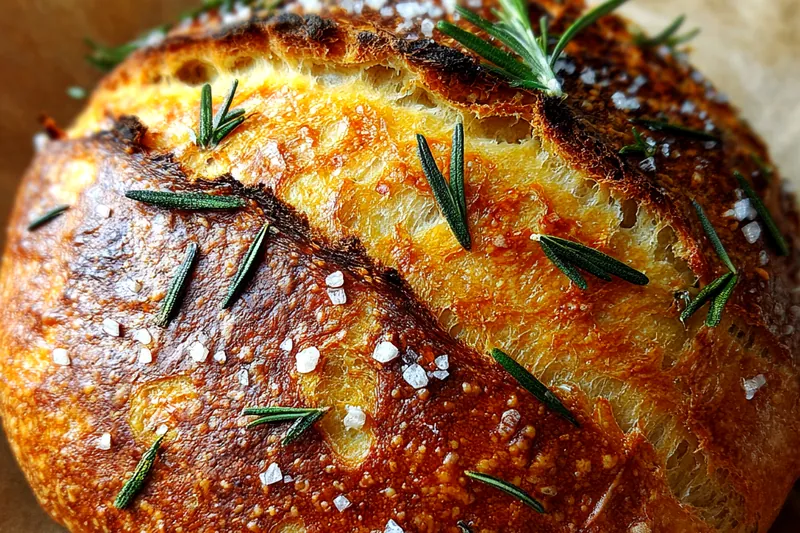
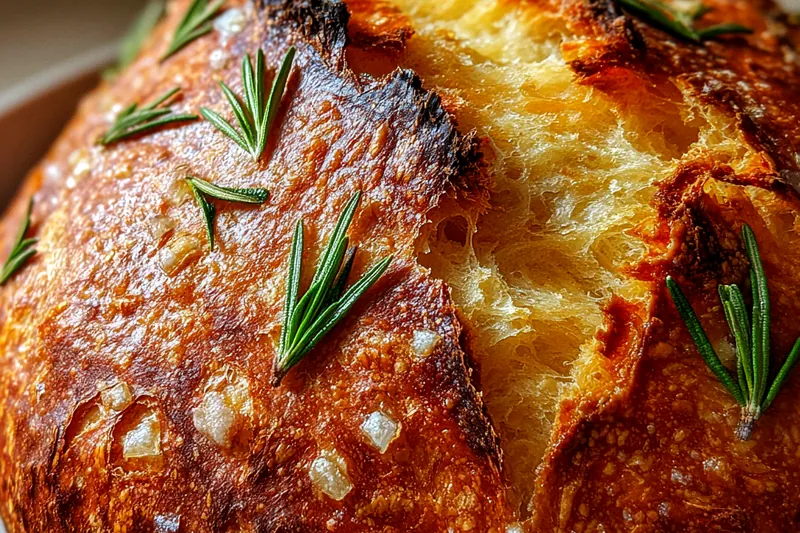
Garlic Parmesan Rosemary Artisan Bread
Discover the irresistible aroma and delightful flavor of homemade Garlic Parmesan Rosemary Artisan Bread. This rustic loaf boasts a perfectly crisp crust and a soft, airy interior, infused with savory garlic, tangy Parmesan, and fragrant rosemary. Ideal as an impressive appetizer, a sophisticated side dish, or simply enjoyed with a drizzle of olive oil, this bread is surprisingly simple to make and guaranteed to impress. Elevate your culinary repertoire with this Italian-inspired masterpiece.

Why This Garlic Parmesan Rosemary Artisan Bread Recipe Works
This recipe for Garlic Parmesan Rosemary Artisan Bread stands out because it strikes the perfect balance between rustic charm and approachability. We're leveraging minimal kneading techniques and an overnight (or long proof) method to develop deep flavor and an incredible open crumb structure, usually associated with advanced baking. The choice of active dry yeast ensures consistent results for home bakers, while the carefully selected aromatic additions — fresh garlic, pungent Parmesan, and earthy rosemary — are infused throughout the dough, not just sprinkled on top, ensuring every bite is bursting with flavor.
The magic truly happens during the proofing and baking stages. A well-hydrated dough, combined with a hot, steamy oven environment (achieved easily with a Dutch oven or a pan of water), is key to developing that signature crisp, shatteringly thin crust. This method traps steam around the loaf, allowing it to expand fully before the crust sets, leading to a light, airy texture inside. The result is a loaf that not only smells heavenly but delivers on texture and taste, transforming simple ingredients into a gourmet experience worthy of any Italian feast.
💡 Professional Tip
For an even more robust flavor and an incredibly airy crumb, consider using a cold fermentation method. After the initial mix and adding flavorings, place the dough in an oiled bowl, cover it, and refrigerate for 12-24 hours. This slow rise develops complex flavors and makes the dough easier to handle. Just bring it back to room temperature for about an hour before shaping and the second proof.
Frequently Asked Questions
Absolutely! You can prepare the dough up to the first rise (bulk fermentation) and then refrigerate it for 12-24 hours. This cold fermentation actually enhances the flavor. When you're ready to bake, remove the dough from the fridge, let it come to room temperature for about an hour, then proceed with shaping, the second proof, and baking. You can also bake the loaf completely and freeze it, then thaw and refresh in the oven.
You can substitute instant yeast for active dry yeast at a 1:1 ratio. If using instant yeast, you don't necessarily need to proof it in warm water first; you can mix it directly with the flour and salt, then add the warm water and olive oil. However, proofing it beforehand helps confirm the yeast is active. If you only have fresh yeast, use twice the amount of active dry yeast, dissolving it in the warm water.
Your artisan bread is done when the crust is a deep golden brown and sounds hollow when tapped on the bottom. For a precise check, use an instant-read thermometer; the internal temperature should be between 200-210°F (93-99°C). Baking it to the correct internal temperature ensures the crumb is fully cooked through and the texture is perfect, preventing a gummy interior.
Yes, this artisan bread freezes beautifully! Once the bread has completely cooled, wrap it tightly in plastic wrap, then an additional layer of aluminum foil, or place it in a freezer-safe bag. It can be stored in the freezer for up to 2-3 months. To reheat, thaw the bread at room temperature, then refresh it in a preheated 350°F (175°C) oven for about 10-15 minutes until warmed through and the crust is crisp again.
This versatile bread is perfect with a wide range of dishes. It makes an excellent accompaniment to Italian-inspired meals like pasta dishes, lasagna, or chicken cacciatore. It's also fantastic for dipping in olive oil with balsamic vinegar, alongside a hearty minestrone or tomato soup, or simply served with a cheese board as an appetizer. Its robust flavor can stand up to rich stews or complement a fresh salad.
Generally, artisan bread is best stored at room temperature, not in the fridge, as refrigeration can dry it out and make it stale faster. Wrapped tightly or stored in a bread box, it will last 2-3 days at room temperature. If you must store it longer, freezing is the better option. If you do put it in the fridge, ensure it's in an airtight container and plan to toast or refresh it before eating to revive its texture.
Yes, making it in advance is a great idea, especially if you want fresh bread without the last-minute rush. You can either bake the entire loaf, let it cool, and then freeze it for later enjoyment, as mentioned in FAQ #4. Alternatively, you can prepare the dough through its first rise (cold fermentation in the fridge) and then bake it fresh the next day. This allows for excellent flavor development and ensures a freshly baked loaf when you need it.
To bring your artisan bread back to life, preheat your oven to 350°F (175°C). If the bread is whole, you can lightly mist it with water (optional, for extra crispness) and bake for 10-15 minutes, or until the crust is crisp and the interior is warm. If you have slices, you can toast them in a toaster oven or a regular oven for a few minutes. Avoid microwaving, as it tends to make bread chewy and tough.
Recipe Troubleshooting Guide
Too Dry
Problem: The bread crumb is dense and dry, lacking an airy texture.
Solution: This often indicates insufficient hydration or overbaking. Ensure you're measuring your flour accurately, preferably by weight (grams), as too much flour will make the dough dry. Also, avoid overbaking; stick to the recommended baking times and temperatures, using an internal thermometer to check doneness.
Not Crispy Enough
Problem: The crust is soft or chewy instead of having a satisfying crackle.
Solution: A lack of steam during the initial bake is usually the culprit. Using a preheated Dutch oven is highly recommended, as it creates a steamy environment. If you don't have one, place a pan of hot water on the bottom rack of your oven during the first part of baking. Ensure adequate cooling on a wire rack to prevent moisture buildup.
Overcooked
Problem: The crust is very dark, hard, or burnt, and the interior might be dry.
Prevention: Prevention is key here. Keep an eye on your bread, especially during the last 15-20 minutes of baking. If the crust is browning too quickly, you can loosely tent it with aluminum foil. Always use an oven thermometer to ensure your oven temperature is accurate, as an oven that runs hot can lead to overcooking.
Undercooked Center
Problem: The bread feels heavy, dense, or gummy in the middle even though the outside looks done.
Recovery: This means the internal temperature didn't reach the target range (200-210°F / 93-99°C). To recover, you can sometimes return the loaf to a 350°F (175°C) oven for another 10-20 minutes, loosely tented with foil to prevent further crust browning. Always use an instant-read thermometer to confirm doneness to avoid this issue.
Burnt Exterior
Problem: The crust is excessively dark, black, or charred in places.
Prevention: To prevent this, ensure your oven rack is in the correct position (middle rack is usually best). If using a baking stone, it might be too close to the top element. If burning occurs quickly, lower the oven temperature slightly for the remaining baking time and tent with foil. Also, verify your oven temperature with an external thermometer.
Flavor Balance
Too Sweet: If too sweet (unlikely for this bread): Reduce sugar by ½ teaspoon in future batches. Ensure precise measurement.
Too Salty: If too salty: Increase other flavors like garlic and rosemary in the next batch, or slightly reduce salt content. Ensure fine sea salt is used for even distribution.
Bland: If bland: Next time, increase the amounts of minced garlic, grated Parmesan, and fresh rosemary. A longer cold fermentation (12-24 hours in the fridge) also significantly deepens the overall flavor profile of the bread.
Essential Ingredients for Garlic Parmesan Rosemary Artisan Bread
The success of this Garlic Parmesan Rosemary Artisan Bread hinges on a few key ingredients, each playing a crucial role. High-quality all-purpose flour provides the structure, while active dry yeast is responsible for the airy texture and rise. Warm water awakens the yeast, and a touch of sugar gives it initial fuel. But what truly elevates this bread are the aromatic additions: fresh garlic, grated Parmesan cheese, and vibrant rosemary. These components intertwine to create a symphony of savory, herbaceous, and slightly tangy notes that define its delicious character.
Beyond the basics, the quality of your flavor-enhancing ingredients can make a significant difference. Opt for fresh garlic cloves, finely minced, rather than pre-minced jars, for the most potent and authentic taste. Choose a good quality block of Parmesan cheese and grate it yourself; pre-grated varieties often contain anti-caking agents that can affect texture and flavor. Fresh rosemary, with its distinct piney aroma, is non-negotiable for that authentic artisan touch. These small choices contribute immensely to the overall depth and complexity of your finished loaf.
Essential Ingredient Notes
- Active Dry Yeast: Ensure your yeast is fresh and active. Proofing it in warm water (105-115°F / 40-46°C) with a pinch of sugar is a crucial step to confirm its viability. If it doesn't foam within 5-10 minutes, your yeast might be old or the water temperature was incorrect, and you should start with a new batch to avoid a flat loaf.
- All-Purpose Flour: While this recipe uses all-purpose flour for ease, weighing your flour is paramount for consistent results. A cup of flour can vary significantly in weight depending on how it's scooped. Using a kitchen scale (360g for 3 cups) will ensure you have the correct flour-to-liquid ratio, leading to the perfect dough consistency and crumb.
- Parmesan Cheese: For the best flavor and melting quality, always use freshly grated Parmesan cheese from a block. Pre-grated Parmesan often contains cellulose, an anti-caking agent, which can prevent it from incorporating smoothly into the dough and can slightly alter the taste. A good quality Parmesan will melt beautifully and infuse a rich, salty tang.
Step-by-Step Cooking Process
Crafting this Garlic Parmesan Rosemary Artisan Bread involves a straightforward process that yields impressive results. The journey begins with activating the yeast, a simple yet critical step, followed by the gentle mixing of dry and wet ingredients to form a cohesive dough. Unlike traditional bread, this recipe often benefits from minimal kneading, allowing time and proper hydration to do most of the work in developing gluten. Incorporating the garlic, Parmesan, and rosemary early ensures their flavors are thoroughly distributed throughout the dough, infusing every bite with deliciousness.
The success of your artisan bread relies heavily on understanding the two rising periods: bulk fermentation and proofing. Bulk fermentation allows the dough to develop flavor and structure, while proofing gives the shaped loaf its final lift before baking. Achieving a perfect crust and airy crumb comes down to preheating your oven thoroughly, ideally with a Dutch oven or a baking stone, and creating steam during the initial bake. This method ensures maximum oven spring and a beautifully crisp exterior, culminating in a bakery-quality loaf from your own kitchen.
Key Technique for Perfect Garlic Parmesan Rosemary Artisan Bread: The Dutch Oven Bake
The most crucial technique for achieving that professional artisan bread quality at home is baking in a preheated Dutch oven. The enclosed, superheated environment of the Dutch oven acts like a miniature steam oven. This steam prevents the crust from setting too quickly, allowing the bread to expand maximally (oven spring) for a light, airy interior. After the initial steamy bake, removing the lid allows the crust to crisp up beautifully and achieve that deep golden-brown color. Don't skip this step for truly superior results!
Garlic Parmesan Rosemary Artisan Bread
📋 Ingredients
Main Ingredients
- 1 tablespoon olive oilFor oiling bowl and brushing
- 4 cloves garlicMinced
- ½ cup grated Parmesan cheeseFreshly grated is best
- 2 tablespoons fresh rosemaryFinely chopped
- Cornmeal or semolinaFor dusting the parchment paper
- Optional: 1 tablespoon melted butterFor post-bake brush
- Optional: additional Parmesan and rosemaryFor topping
For the Flavoring & Topping
- 3 cups (360g) all-purpose flourPlus more for dusting
- 1 teaspoon active dry yeastEnsure it's fresh
- 1 teaspoon granulated sugarFeeds the yeast
- 1 teaspoon fine sea saltEssential for flavor
- 1 ½ cups warm water105-115°F (40-46°C)
- 1 tablespoon olive oilFor the dough
Instructions
Activate Yeast
In a large mixing bowl, combine 1 ½ cups warm water, 1 teaspoon sugar, and 1 teaspoon active dry yeast. Stir gently and let sit for 5-10 minutes until foamy, indicating the yeast is active.
Combine Dry Ingredients
In a separate large bowl, whisk together 3 cups all-purpose flour and 1 teaspoon fine sea salt. Create a well in the center of the flour mixture.
Mix Dough
Pour the activated yeast mixture and 1 tablespoon of olive oil (for the dough) into the well. Mix with a wooden spoon or a stand mixer with a dough hook on low speed until a shaggy dough forms. Continue mixing/kneading for 5-7 minutes until the dough comes together.
Add Flavorings
Add the 4 cloves of minced garlic, ½ cup grated Parmesan, and 2 tablespoons chopped fresh rosemary to the dough. Mix on low speed until just combined, ensuring the flavors are evenly distributed without overmixing.
First Rise (Bulk Fermentation)
Lightly coat a clean bowl with the remaining 1 tablespoon of olive oil. Transfer the dough to the oiled bowl, turning once to coat all sides. Cover the bowl with plastic wrap or a damp towel and let it rise in a warm place for 1.5 to 2 hours, or until doubled in size.
Shape the Loaf
Gently punch down the risen dough to release air. Turn it out onto a lightly floured surface. Gently shape into a rustic round or oval loaf, using your hands to create a taut surface by folding the edges underneath.
Second Rise (Proofing)
Place the shaped loaf onto a piece of parchment paper generously dusted with cornmeal or semolina. Cover loosely with plastic wrap or a damp towel and let it proof for another 30-45 minutes, or until noticeably puffy and springs back slowly when gently poked.
Preheat Oven & Score
While the dough proofs, preheat your oven to 450°F (230°C) with a Dutch oven (or a baking stone with a heat-safe pan for water on the bottom rack) inside for at least 30 minutes. Once preheated, carefully transfer the loaf (with parchment) into the hot Dutch oven. Score the top of the bread with a sharp knife or razor blade (a 'lame') to allow for even expansion.
Bake
Bake the bread with the lid on the Dutch oven (or with water in the pan for steam) for 30 minutes. Remove the lid (or water pan) and continue baking for another 15-20 minutes, or until the crust is deep golden brown and the internal temperature reaches 200-210°F (93-99°C). For an extra shine, you can brush with melted butter during the last few minutes.
Cool
Carefully remove the bread from the oven and transfer it to a wire rack to cool completely before slicing and serving. Cooling allows the internal structure to set and prevents a gummy texture, crucial for achieving that perfect artisan crumb.
Recipe Notes & Tips
Storage Tips
To maintain its crisp crust, store leftover Garlic Parmesan Rosemary Artisan Bread at room temperature in a paper bag for the first day. For longer storage, transfer it to an airtight container or wrap tightly in plastic wrap to prevent it from drying out, where it will last up to 2-3 days. Avoid refrigerating, as it can accelerate staling. For extended freshness, see the freezing tips in the FAQ section.
Serving Suggestions
This robustly flavored artisan bread is incredibly versatile. Serve it warm with a simple bowl of olive oil and a dash of balsamic vinegar for dipping, alongside a hearty Italian soup like Ribollita or Pasta Fagili. It's also fantastic as a side for roasted chicken, grilled fish, or any pasta dish. For a simple appetizer, slice it, toast lightly, and top with bruschetta or tapenade.
Recipe Variations
Feel free to customize this artisan bread! For a spicy kick, add a pinch of red pepper flakes with the garlic and rosemary. You could also incorporate sun-dried tomatoes (chopped) or Kalamata olives (pitted and chopped) for an extra layer of Mediterranean flavor. Different hard cheeses, like Pecorino Romano, can be used instead of Parmesan. Experiment with other fresh herbs such as thyme or oregano for a different aromatic profile.