No-Bake Peanut Butter Pie
This no-bake peanut butter pie is the ultimate crowd-pleaser with its silky peanut butter filling, chocolate cookie crust, and decadent toppings. The combination of cream cheese and whipped cream creates an incredibly light yet rich texture that melts in your mouth. Perfect for summer entertaining when you want an impressive dessert without turning on the oven.

Why This No-Bake Pie Works Every Time
The magic of this no-bake peanut butter pie lies in its foolproof technique that eliminates common dessert disasters. By using a combination of cream cheese and whipped cream, we create a mousse-like texture that's stable enough to slice cleanly yet light enough to feel indulgent rather than heavy. The cream cheese acts as a stabilizer, preventing the filling from becoming too soft or weeping liquid, while the whipped cream adds airiness that keeps each bite from feeling dense.
Temperature control is crucial for success with this recipe. Room temperature cream cheese blends smoothly without lumps, while cold heavy cream whips up to perfect peaks. The 4-hour chill time isn't just a suggestion, it's what allows the filling to set properly so you get clean slices instead of a puddle on the plate. Many home bakers rush this step and end up disappointed, but patience truly pays off with a pie that looks as professional as it tastes.
💡 Professional Tip
Always fold whipped cream into the peanut butter mixture in thirds rather than all at once. This gentle technique preserves the air bubbles you worked hard to create, resulting in a lighter, fluffier filling that holds its shape beautifully.
Frequently Asked Questions
Absolutely! This pie is actually better when made a day ahead, as it gives the flavors time to meld and the filling to set completely. You can make it up to 3 days in advance and store it covered in the refrigerator. Add the peanut butter cup topping and caramel drizzle just a few hours before serving to keep them fresh and crisp.
I don't recommend natural peanut butter for this recipe because the oils separate and the texture is too grainy, which affects the smooth, creamy consistency we're after. Stick with conventional creamy peanut butter like Jif or Skippy for the best results. The stabilizers in these brands actually help the filling set properly.
A soft filling usually means the pie hasn't chilled long enough or the whipped cream wasn't beaten to stiff peaks. Make sure you refrigerate for the full 4 hours minimum, and when whipping cream, beat until the peaks stand straight up when you lift the beaters. If your filling is still soft after proper chilling, pop it in the freezer for 30 minutes before serving.
Yes, you can use 1 3/4 cups graham cracker crumbs mixed with 6 tablespoons melted butter and 2 tablespoons sugar for a traditional crust. However, the chocolate Oreo crust provides a wonderful contrast to the peanut butter filling that elevates this dessert. If you prefer chocolate graham crackers, those work beautifully as a middle-ground option.
Since this is a no-bake pie, there's no cooking involved. The pie is ready when the filling is completely firm to the touch and doesn't jiggle when you gently shake the pan. After the minimum 4-hour chill time, press the center lightly with your finger, it should feel solid and spring back rather than leaving an indent. If it still feels soft, chill for another hour.
This rich pie pairs wonderfully with fresh berries, especially raspberries or strawberries, which cut through the richness with their tartness. A dollop of lightly sweetened whipped cream on the side adds elegance, or serve with a hot cup of coffee for a perfect flavor contrast. For chocolate lovers, a drizzle of hot fudge sauce alongside each slice creates an over-the-top dessert experience.
Yes! Simply substitute gluten-free chocolate sandwich cookies for the Oreos in the crust. Many brands make excellent alternatives that taste nearly identical. You can also use a gluten-free graham cracker crust. The filling is naturally gluten-free as long as you verify your peanut butter doesn't contain any gluten-containing additives.
Cover the pie tightly with plastic wrap or aluminum foil and store in the refrigerator for up to 5 days. The pie actually maintains its texture well over several days. For longer storage, you can freeze individual slices wrapped tightly in plastic wrap and then foil for up to 2 months. Thaw in the refrigerator overnight before serving.
Recipe Troubleshooting Guide
Lumpy Filling
Problem: The cream cheese created lumps that won't smooth out in the filling.
Solution: This happens when cream cheese is too cold. Always let it sit at room temperature for at least 30 minutes before using. If you already have lumps, press the mixture through a fine-mesh sieve, or beat it on high speed for 3-4 minutes until completely smooth before adding other ingredients.
Crust Falling Apart
Problem: The Oreo crust crumbles when trying to slice the pie.
Solution: This means there wasn't enough butter to bind the crumbs, or the crust wasn't pressed firmly enough. The mixture should feel like wet sand. Press it very firmly into the pan using the bottom of a measuring cup, especially around the edges and corners. Freezing for 15 minutes also helps it set properly.
Whipped Cream Deflated
Problem: The whipped cream lost volume after folding it into the peanut butter mixture.
Prevention: You likely overmixed when folding. Use a rubber spatula and fold gently in a swooping motion from bottom to top, rotating the bowl as you go. It's okay if you see a few streaks of white, that's better than deflating all the air. Mix in thirds and work quickly but gently.
Pie Too Sweet
Problem: The overall sweetness is overwhelming.
Recovery: Reduce the powdered sugar to 3/4 cup and add an extra 1/4 teaspoon of salt to the filling. Using dark chocolate Oreos instead of regular also helps balance sweetness. You can also substitute half the peanut butter with a more natural, less-sweet variety.
Watery Filling
Problem: Liquid is separating from the filling after chilling.
Prevention: This happens when whipped cream is overbeaten and then breaks down, or if ingredients weren't at proper temperature. Make sure cream cheese is soft but not warm, and don't overwhip the cream past stiff peaks. If this happens, you can try freezing the pie for 2 hours to firm it up, though texture may be slightly affected.
Flavor Balance Issues
Too Sweet: Add 1/4 teaspoon more salt and reduce powdered sugar to 3/4 cup next time. A squeeze of lemon juice can also cut sweetness.
Too Salty: Add 2-3 tablespoons more powdered sugar and an extra 1/4 cup whipped cream to dilute the saltiness.
Bland: Increase vanilla to 2 teaspoons and add 1/4 teaspoon almond extract. Make sure you're using quality peanut butter with good flavor.
Selecting Quality Ingredients for Best Results
The simplicity of this no-bake pie means each ingredient plays a starring role, so quality matters more than in recipes with dozens of components. Start with full-fat cream cheese, never the reduced-fat version, as the fat content is essential for proper texture and richness. Similarly, use heavy whipping cream with at least 36% fat content, anything less won't whip properly or hold its structure. Generic brands work fine as long as they meet these fat requirements, so you don't need to splurge on premium dairy.
For peanut butter, choose a well-stirred conventional brand rather than natural or organic varieties. While natural peanut butter is healthier, its separated oils and grainy texture create problems in no-bake desserts. Brands like Jif, Skippy, or Peter Pan have emulsifiers that help create the smooth, stable filling we want. Fresh is also important, check the date on your cream and cream cheese to ensure they haven't been sitting in your fridge for weeks, as older dairy products can have off flavors that become noticeable in simple recipes.
Essential Ingredient Notes
- Cream Cheese: Choose brick-style cream cheese, not the spreadable tub variety which contains stabilizers that affect texture. Let it sit at room temperature for 30-45 minutes until it feels soft when pressed but still holds its shape. If you're short on time, cut it into small cubes to speed softening, never microwave as this can make it grainy.
- Peanut Butter: Use creamy, not crunchy, peanut butter for the smoothest filling. The jar should be freshly opened or thoroughly stirred if there's any oil separation. Room temperature peanut butter blends more easily, so take it out of the pantry when you remove the cream cheese from the fridge.
- Heavy Cream: Make sure your heavy cream is very cold, ideally near 35°F. For best results, chill your mixing bowl and beaters in the freezer for 10 minutes before whipping. The colder everything is, the faster and more stable your whipped cream will be. Avoid ultra-pasteurized cream if possible, as it doesn't whip as well.
Mastering the Folding Technique
The most critical step in this recipe is folding the whipped cream into the peanut butter mixture, and it's where many home bakers stumble. Folding is a gentle mixing technique designed to combine ingredients while preserving air bubbles that create a light, fluffy texture. Unlike stirring or beating which deflate whipped cream, folding uses a swooping motion that lifts and turns the mixture. Start by adding just one-third of the whipped cream to the peanut butter mixture and fold until barely combined, this first addition lightens the dense base and makes the remaining cream easier to incorporate.
For the remaining whipped cream, add it in two more additions, folding just until you no longer see large streaks of white. A few small streaks are fine, overmixing is worse than undermixing. Use a large rubber spatula and cut down through the center of the mixture, scrape along the bottom of the bowl, then bring the spatula up the side and fold over the top. Rotate the bowl a quarter turn and repeat. This motion, done 8-10 times per addition, preserves the airiness while ensuring everything is combined. The final mixture should look like a fluffy cloud with a pale peanut butter color throughout.
The Perfect Fold
Hold your spatula vertically and cut straight down through the center of the bowl to the bottom. Scrape along the bottom toward you, then bring the spatula up the side and fold the mixture over the top in one fluid motion. Rotate the bowl 90 degrees and repeat. This technique maintains maximum volume while ensuring even distribution of ingredients. Work confidently but gently, the whole process should take about 30-45 seconds per addition of whipped cream.
No-Bake Peanut Butter Pie
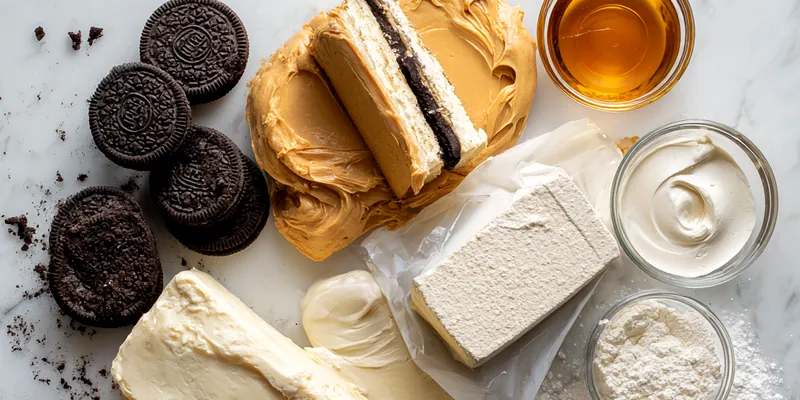
📋 Ingredients
For the Crust
- 24 Oreo cookies (about 2 cups crushed)Use regular Oreos, not Double Stuf, for proper crust texture
- 5 tablespoons unsalted butter, meltedShould be fully melted but not hot
For the Filling
- 8 oz cream cheese, softened to room temperatureMust be soft enough to easily beat smooth
- 1 cup creamy peanut butterUse conventional brands like Jif or Skippy, not natural
- 1 cup powdered sugarSift if clumpy for smoothest texture
- 1 teaspoon pure vanilla extractPure extract tastes better than imitation
- 1/4 teaspoon saltBalances sweetness and enhances peanut butter flavor
- 1 1/2 cups heavy whipping cream, coldMust be very cold for proper whipping
- 3 tablespoons granulated sugarFor sweetening the whipped cream
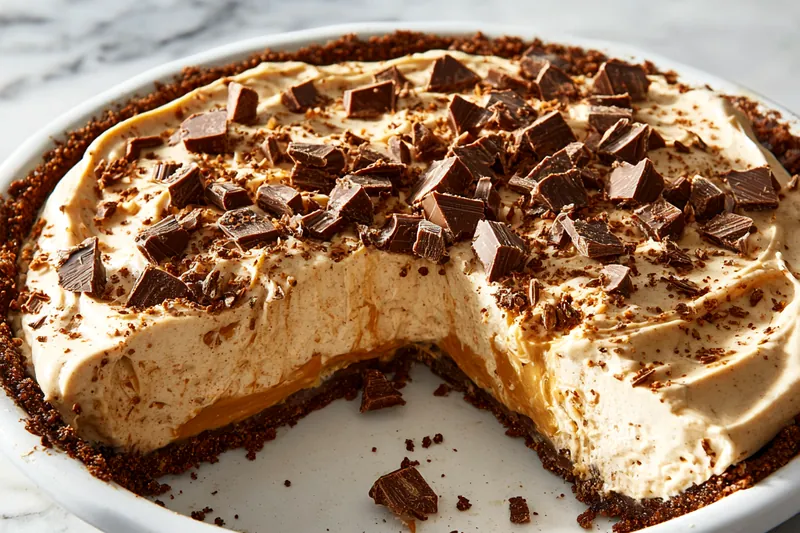
- 1/2 cup chopped peanut butter cups for toppingRoughly chop regular or mini cups
- 1/4 cup mini chocolate chipsMini size distributes better than regular
- 2 tablespoons caramel sauce for drizzlingUse slightly warm sauce for easier drizzling
Instructions
Make the Oreo Crust
Crush Oreos in a food processor until fine crumbs form, pulsing about 15-20 times. Mix with melted butter until mixture resembles wet sand and holds together when pressed. Press firmly into the bottom and up the sides of a 9-inch pie pan using the bottom of a measuring cup or glass. Freeze for 15 minutes while preparing filling to help it set.
Prepare Peanut Butter Mixture
Beat cream cheese in a large bowl with electric mixer until smooth and fluffy, about 2 minutes. Add peanut butter, powdered sugar, vanilla, and salt. Beat on medium speed until completely combined and creamy with no lumps, scraping down sides as needed. The mixture will be thick but smooth.
Whip the Cream
In a separate chilled bowl with chilled beaters, whip heavy cream with granulated sugar starting on low speed and gradually increasing to high. Beat until stiff peaks form, about 3-4 minutes. When you lift the beaters, peaks should stand straight up. Be careful not to overwhip or cream will become grainy.
Fold and Assemble
Add one-third of whipped cream to peanut butter mixture and gently fold with rubber spatula until mostly combined. Add remaining whipped cream in two additions, folding carefully after each addition until no large white streaks remain. Avoid overmixing. Spoon filling into prepared frozen crust and smooth the top with an offset spatula or back of spoon.
Add Toppings and Chill
Sprinkle chopped peanut butter cups and mini chocolate chips evenly over the top of the pie. Warm caramel sauce for 10 seconds if needed, then drizzle over toppings in a decorative back-and-forth pattern. Cover loosely with plastic wrap and refrigerate for at least 4 hours or overnight until completely set and firm.
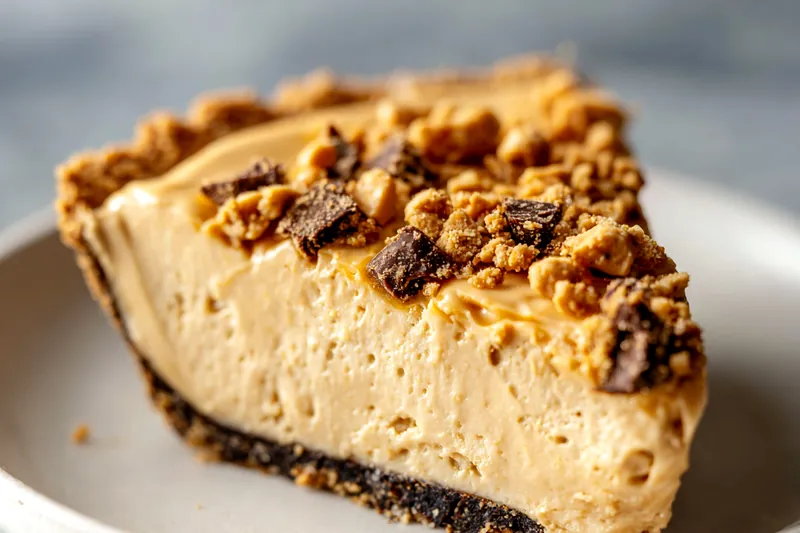
Serve
Remove pie from refrigerator and let sit at room temperature for 5-10 minutes before slicing for easiest cutting. Use a sharp knife dipped in hot water, wiping clean between each slice for neat, professional-looking portions. Serve immediately and refrigerate any leftovers.
Recipe Notes & Tips
Storage
Store covered in refrigerator for up to 5 days. The pie maintains its texture well over several days. For longer storage, freeze individual slices wrapped in plastic wrap and foil for up to 2 months. Thaw overnight in refrigerator before serving.
Serving Suggestions
Serve with fresh berries, extra whipped cream, or a drizzle of hot fudge sauce. Pairs beautifully with coffee or cold milk. For special occasions, garnish each slice with a whole mini peanut butter cup and a mint leaf.
Variations
Try a chocolate graham cracker crust, add 1/4 cup cocoa powder to filling for chocolate peanut butter version, use chopped Snickers instead of peanut butter cups, or swirl in 1/4 cup melted chocolate before chilling for a marbled effect.