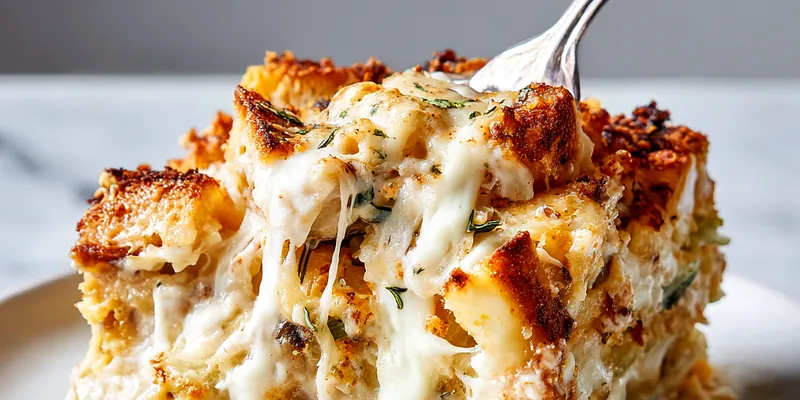
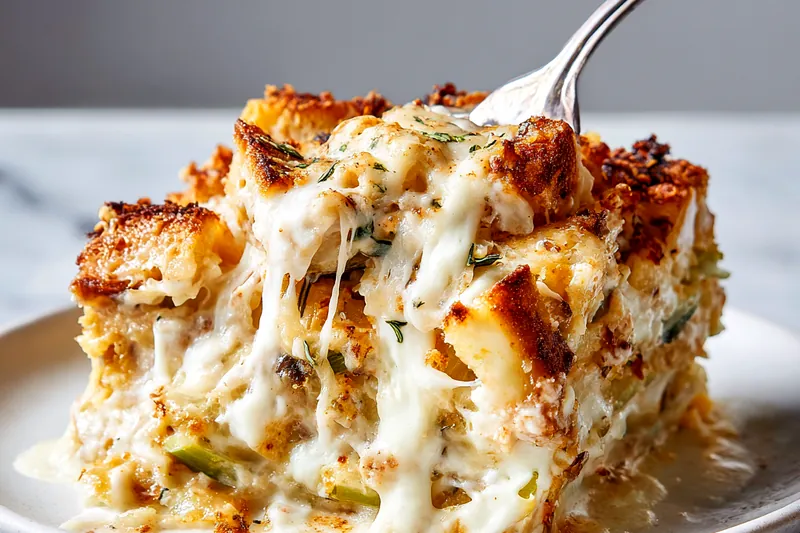
Ultimate Creamy Baked Mac and Cheese
This isn't your average boxed mac and cheese. We're talking about a truly luxurious baked macaroni and cheese with three types of cheese melted into a silky, creamy sauce that coats every single noodle. The golden, buttery breadcrumb topping adds the perfect crunchy contrast to the rich, velvety pasta underneath.

Why This Mac and Cheese Recipe Works
The secret to exceptional mac and cheese lies in understanding the science of a proper cheese sauce. By starting with a roux (butter and flour cooked together), we create a stable base that prevents the cheese from separating or becoming grainy when heated. The ratio of milk to cream provides the perfect consistency—creamy enough to coat the pasta luxuriously, but not so thick that it becomes gluey. Warming the milk before adding it to the roux prevents temperature shock and helps create a silky-smooth sauce without lumps.
Using three different cheeses isn't just about flavor—each cheese serves a specific purpose. Sharp cheddar provides that classic tangy mac and cheese taste we all crave. Gruyere adds a nutty depth and superior melting quality that creates that gorgeous cheese pull. Mozzarella contributes a mild creaminess and those irresistible stretchy cheese strands. Together, they create a complex flavor profile that's far superior to using a single cheese. The touch of Dijon mustard acts as a flavor enhancer, making the cheese taste more intensely cheesy without adding any noticeable mustard flavor.
💡 Professional Tip
Always undercook your pasta by 2 minutes when making baked mac and cheese. The pasta will continue cooking in the oven and absorb some of the sauce, so starting with slightly firm pasta ensures it won't turn mushy. Also, shred your own cheese from blocks rather than buying pre-shredded—the anti-caking agents in pre-shredded cheese can prevent smooth melting.
Frequently Asked Questions
Absolutely! Prepare the entire dish through step 4, cover tightly with foil, and refrigerate for up to 24 hours. When ready to bake, let it sit at room temperature for 30 minutes, then bake covered at 375°F for 20 minutes. Remove the foil and bake for an additional 15-20 minutes until golden and bubbly. You can also freeze it unbaked for up to 3 months—thaw in the refrigerator overnight before baking.
Yes, though the flavor will change. For the cheddar, you can use mild or extra sharp depending on preference. Instead of gruyere, fontina or gouda work beautifully. Monterey Jack or provolone can replace mozzarella. Avoid using only hard cheeses like parmesan as they don't create the creamy texture you want. Always include at least one good melting cheese like mozzarella, fontina, or monterey jack for the best texture.
Graininess usually happens when the heat is too high or the cheese is added to sauce that's too hot. Always remove the pot from heat before stirring in cheese, and use medium or medium-low heat when making the roux and sauce. Pre-shredded cheese can also cause graininess due to anti-caking agents—always shred your own from blocks. If your sauce does separate, whisk in a tablespoon of cold milk or cream to help bring it back together.
Definitely! While elbow macaroni is classic, cavatappi (corkscrew), shells, penne, or rigatoni all work wonderfully. Choose pasta shapes with ridges or hollow centers that trap the cheese sauce. Avoid delicate pasta like angel hair or long noodles like spaghetti, as they don't hold the sauce as well. Whatever shape you choose, remember to undercook it by 2 minutes since it will continue cooking in the oven.
Your mac and cheese is perfectly baked when the breadcrumb topping is golden brown and crispy, the sauce is actively bubbling around the edges of the dish, and you can see the cheese sauce has thickened slightly. The internal temperature should reach 165°F. If the top is browning too quickly but the sauce isn't bubbling yet, tent the dish loosely with foil and continue baking. The 5-minute rest after baking is crucial—it allows the sauce to set up so it doesn't run all over the plate when serving.
Since mac and cheese is quite rich, pair it with lighter sides. A crisp green salad with vinaigrette cuts through the richness perfectly. Roasted vegetables like broccoli, Brussels sprouts, or green beans add color and nutrition. For a complete comfort food meal, serve alongside baked chicken, pulled pork, or BBQ ribs. A tangy coleslaw or pickled vegetables also provide a nice acidic contrast. Keep sides simple so the mac and cheese remains the star of the plate.
Absolutely! This recipe is incredibly versatile. Stir in cooked bacon, diced ham, or shredded rotisserie chicken for added protein. Sautéed mushrooms, caramelized onions, or roasted garlic add depth. For vegetables, try blanched broccoli, roasted butternut squash, or sautéed spinach. Add mix-ins after combining the pasta with the cheese sauce. For a spicy version, increase the cayenne or add diced jalapeños. Just avoid adding too many wet ingredients, which can make the sauce watery.
Store cooled mac and cheese in an airtight container in the refrigerator for up to 4 days. To reheat, add a splash of milk or cream (2-3 tablespoons per portion) to restore creaminess, and warm in the microwave in 30-second intervals, stirring between each, or bake covered at 350°F for 15-20 minutes. The breadcrumb topping won't be as crispy after reheating, but you can refresh it under the broiler for 1-2 minutes. Avoid reheating more than once as the pasta can become mushy.
Recipe Troubleshooting Guide
Sauce Is Too Thick
Problem: The cheese sauce became too thick and paste-like, making it difficult to coat the pasta evenly.
Solution: Thin the sauce by whisking in warm milk or cream, one tablespoon at a time, until you reach the desired consistency. The sauce should be thick enough to coat the back of a spoon but still flow easily. Remember that the sauce will thicken slightly as it bakes, so err on the side of slightly thinner when mixing with pasta.
Sauce Is Too Thin
Problem: The cheese sauce is runny and watery, not coating the pasta properly.
Solution: Return the sauce to medium heat and simmer gently for 3-5 minutes to reduce and thicken, stirring frequently. Make sure you cooked the roux long enough initially—it needs at least 2 minutes to cook out the raw flour taste and develop thickening power. You can also add an extra 1/2 cup of shredded cheese, which will help thicken the sauce while boosting flavor.
Top Burning Before Cheese Bubbles
Problem: The breadcrumb topping is getting too dark while the mac and cheese underneath isn't fully heated through.
Prevention: Tent the dish loosely with aluminum foil to protect the topping from direct heat while the interior continues cooking. Next time, try placing the baking dish on a lower oven rack, which provides more gentle, even heat. If your oven runs hot, reduce the temperature to 350°F and bake for a few minutes longer.
Dry or Stiff Texture
Problem: The baked mac and cheese came out dry and stiff rather than creamy and saucy.
Recovery: This usually means there wasn't enough sauce for the amount of pasta, or the pasta was overcooked initially and absorbed too much moisture. Next time, make sure your pasta is quite saucy before baking—it should look almost too wet. You can rescue a dry batch by drizzling 1/2 cup of warm cream or milk over the top before baking, and covering with foil for the first 15 minutes of baking to trap moisture.
Bland Flavor
Problem: The mac and cheese tastes flat or lacks depth despite using good cheese.
Prevention: Salt is crucial—the sauce needs enough salt to bring out the cheese flavors. Taste and adjust before baking. The Dijon mustard, garlic powder, and onion powder are also essential for flavor depth. A pinch of cayenne adds complexity without heat. If already baked, serve with hot sauce or extra pepper. Next time, consider using aged or extra sharp cheddar for more pronounced flavor.
Flavor Balance Issues
Too Sweet: If the dish tastes unexpectedly sweet, you may have used a sweeter cheese blend or pre-shredded cheese with added dextrose. Balance it by stirring in a teaspoon of Dijon mustard or a squeeze of lemon juice.
Too Salty: If too salty, dilute the sauce with a bit of unsalted cream or milk. You can also add more plain cooked pasta to distribute the saltiness. Use unsalted butter next time and add salt gradually while tasting.
Bland: Boost bland mac and cheese by stirring in extra sharp cheddar, a tablespoon of Dijon, garlic powder, white pepper, or a dash of hot sauce. Fresh herbs like thyme or chives added before serving also brighten the flavor.

Choosing the Right Ingredients for Perfect Mac and Cheese
The quality of your cheese makes or breaks this dish. Always buy blocks of cheese and shred them yourself—pre-shredded cheese contains cellulose (an anti-caking agent) that prevents smooth melting and can result in a grainy, separated sauce. Look for aged sharp cheddar with bold flavor rather than mild cheddar which can taste flat. True Gruyere from Switzerland has the best flavor, but if it's too expensive, look for American-made gruyere or substitute with fontina or aged gouda. Fresh mozzarella is too wet for this recipe—use low-moisture mozzarella for proper texture.
For the creamiest result, use whole milk and heavy cream rather than low-fat alternatives. The fat content is essential for creating that luxurious, velvety sauce that coats your tongue. When it comes to pasta, bronze-cut varieties have a rougher texture that helps sauce cling better, though regular elbow macaroni works perfectly fine. Use unsalted butter so you can control the salt level precisely. Quality really matters with Dijon mustard—a good stone-ground or grainy Dijon adds complexity, while cheap yellow mustard will taste too sharp and vinegary.
Essential Ingredient Notes
- Sharp Cheddar Cheese: Choose aged sharp or extra sharp cheddar for maximum flavor. The orange color comes from annatto, a natural coloring—white cheddar works equally well and often has a slightly sharper taste. Look for blocks labeled 'sharp' or 'aged at least 12 months.' Avoid pre-shredded for the smoothest sauce.
- Gruyere Cheese: This Swiss cheese is prized for its exceptional melting quality and nutty, slightly sweet flavor. It creates those beautiful cheese pulls and adds sophisticated depth. If unavailable or too pricey, substitute with fontina, aged gouda, or comte. Avoid using all American or processed cheese—you'll miss the complex flavor.
- Panko Breadcrumbs: Japanese panko breadcrumbs create a lighter, crispier topping than regular breadcrumbs due to their larger, flakier texture. Look for plain, unseasoned panko. Tossing them with melted butter ensures they brown beautifully and stay crunchy. Regular breadcrumbs work in a pinch but may not be quite as crispy.
Mastering the Technique for Restaurant-Quality Results
Creating a perfect cheese sauce relies on mastering the roux, which is simply butter and flour cooked together. This mixture acts as a thickening agent and emulsifier, keeping the cheese and milk from separating. Cook your roux over medium heat for at least 2 minutes—you want it to turn a light golden color and smell nutty, not raw and pasty. When adding the warm milk, do so gradually while whisking constantly. This prevents lumps from forming and ensures a silky-smooth sauce. If lumps do appear, don't panic—simply strain the sauce through a fine-mesh sieve before adding the cheese.
The key to perfectly melted cheese is temperature control. Remove your sauce from the heat completely before stirring in the cheese. Hot burners can cause the cheese proteins to seize up and become grainy or stringy in an unpleasant way. Add the cheese in batches, stirring after each addition until completely melted before adding more. This gradual method ensures even melting. When combining pasta with sauce, work quickly while both are still hot—the residual heat helps the sauce coat every noodle perfectly. The slight undercooking of the pasta is intentional, as it will absorb some sauce and continue cooking during baking, resulting in perfectly tender but not mushy noodles.
The Perfect Roux
A roux is the foundation of creamy cheese sauce. Melt butter over medium heat until foamy, then whisk in flour. Cook for 2-3 minutes, whisking constantly, until the mixture turns light golden and smells nutty—this cooks out the raw flour taste. The roux should have the consistency of wet sand. Add warm milk gradually while whisking to prevent lumps. The ratio is 4 tablespoons butter to 1/4 cup flour to 4 cups liquid for the perfect thickness.
Ultimate Creamy Baked Mac and Cheese
📋 Ingredients
For the Cheese Sauce
- 4 tablespoons unsalted butterUse unsalted to control salt level
- 1/4 cup all-purpose flourCreates the roux for thick, smooth sauce
- 3 cups whole milk, warmedWarm milk prevents lumps
- 1 cup heavy creamMakes the sauce extra luxurious
- 3 cups sharp cheddar cheese, shreddedShred from block for best melting
- 1 1/2 cups gruyere cheese, shreddedAdds nutty flavor and stretch
- 1 cup mozzarella cheese, shreddedCreates creamy texture
- 1 teaspoon Dijon mustardEnhances cheese flavor
- 1/2 teaspoon garlic powderAdds savory depth
- 1/2 teaspoon onion powderRounds out flavors
- 1/4 teaspoon cayenne pepperOptional, adds subtle warmth
- 1 teaspoon saltEssential for bringing out cheese flavor
- 1/2 teaspoon black pepperFreshly ground is best
For the Crispy Topping
- 1 pound elbow macaroniOr any short pasta shape
- 1 cup panko breadcrumbsCreates extra crispy topping
- 2 tablespoons melted butterFor mixing with breadcrumbs
- 1/4 cup grated parmesan cheeseAdds savory note to topping
- Fresh thyme for garnishOptional, for fresh herbal note
Instructions
Cook the Pasta
Preheat oven to 375°F. Cook elbow macaroni in salted boiling water for 2 minutes less than package directions (pasta should be slightly firm). Drain and set aside. Do not rinse as the starch helps sauce cling to pasta.
Make the Cheese Sauce
In a large pot over medium heat, melt 4 tablespoons butter. Whisk in flour and cook for 2 minutes until golden and fragrant. Gradually add warm milk and cream, whisking constantly to prevent lumps. Cook until sauce thickens enough to coat the back of a spoon, about 5-7 minutes.
Add Cheese and Seasonings
Remove from heat and stir in cheddar, gruyere, and mozzarella cheeses until completely melted and smooth. Add Dijon mustard, garlic powder, onion powder, cayenne, salt, and pepper. Fold in cooked pasta until every piece is coated in the creamy sauce.
Prepare the Topping
Pour mac and cheese into a greased 9x13 inch baking dish. In a small bowl, combine panko breadcrumbs with 2 tablespoons melted butter and parmesan cheese. Sprinkle evenly over the top for maximum crunch.
Bake to Perfection
Bake uncovered for 25-30 minutes until the top is golden brown and crispy, and the sauce is bubbling around the edges. Let rest for 5 minutes before serving to allow the sauce to set slightly. Garnish with fresh thyme.
Recipe Notes & Tips
Storage
Store cooled mac and cheese in an airtight container in the refrigerator for up to 4 days. To reheat, add a splash of milk or cream and warm in the microwave or oven at 350°F. Can be frozen for up to 3 months—thaw overnight in refrigerator before reheating.
Serving Suggestions
Serve as a main dish with a crisp green salad and crusty bread, or as a side dish with BBQ chicken, ribs, or pulled pork. Perfect for potlucks, holidays, or weeknight family dinners. Pairs beautifully with roasted vegetables or coleslaw.
Variations
Add cooked bacon, diced ham, or shredded chicken for protein. Mix in blanched broccoli, roasted butternut squash, or sautéed mushrooms. For a spicier version, add jalapeños or increase cayenne. Try different cheese combinations like smoked gouda, white cheddar, or fontina for varied flavor profiles.